OverView
This portfolio seeks to document my contributions to our team’s project, TA-Tracker. Ta-Tracker is a productivity tool designed for NUS School of Computing Teaching Assistants (TAs). TAs can track and manage all their claimable hours and the students they are teaching in one place.
About this portfolio
This project portfolio details my individual contributions to the TA-Tracker project. It includes a summary of the enhancements and other contributions I made throughout the duration of the project. Additionally, portions of my contribution to the User Guide and Developer Guide have also been included.
Summary of contributions
The contributions I have made towards the team project are detailed in this section.
Major Enhancement: I added the ability to filter under each view.
-
What it does: The
filtercommand allows the user to search for relevant information under the different views.-
Under the Student View, there is
FilterStudentCommandto filter the students. -
Under the Session View, there is
FilterSessionCommandto filter the sessions. -
Under the Claims View, there is
FilterClaimCommandto filter the claims.
-
-
Justification: This is a necessary feature for a system that manages a lot of data. Sometimes, users only need to view specific information. That is when the
filtercommand is handy. -
Highlights: This enhancement affects existing commands and has to support future commands. Since the filtering works differently under the different views, the implementation of each filter command is different. The implementation was challenging as it required a lot of changes to the existing find command in AB3. Furthermore, there was a need to ensure that certain restrictions are met before doing the filtering to ensure that our codebase is consistent.
Major Enhancement: Recurring Sessions.
-
What it does: Recurring sessions allows TAs to mark a session as recurring so they don’t have to enter it again and again. When the TA marks a recurring session as done, a new session with the updated date will be added to the list of sessions.
-
Justification: Certain tasks that TAs have are weekly, such as weekly tutorials. This feature makes TA-Tracker more user-friendly as the user does not have to key in the same details for a session every week manually.
-
Highlights: This feature was difficult to implement as there were several considerations to be taken care of. Furthermore, it had been implemented in a different way. We initially assumed that recurring lessons would be on a weekly basis. However, we realised that we should not make that assumption. Significant changes were made in order to allow TAs to indicate the number of recurring weeks that they want.
Other Minor Enhancements : Session related commands.
-
Justifications:
AddSessionCommand,DeleteSessionCommandandlistcommands are essential for TAs to manipulate data in Session View. -
Highlights: While they are minor enhancements, implementation of these commands have to be thorough. This is because there are many small details to take note of. One example is the sorting of sessions when TA adds a new session. Sessions shown to TA have to be sorted based on date, start time and end time of sessions.
Code Contributed
The code I contributed can be found here.
Contributions to the User Guide
We wrote a User Guide targeted at the users of TA-Tracker.
The User Guide contains instructions on how to use the various commands
of the application. The following is an excerpt from our User Guide,
showing additions that I have made for filter and Session features.
Session View
(Contributed by Chua Yi Jing)
Under the session tab, the Session View contains a list of the upcoming sessions
that you haven’t done yet.
The sessions are automatically sorted by date.
The purpose of the Session View is to help you keep track a of your upcoming teaching. duties. It will show you information such as:
-
SESSION_TYPE: the type of session -
DATE: the date that the session will occur on -
STARTandEND: the start time and end time of the session -
MODULE: the module that the session is under -
NOTES: any additional information -
WEEK: the recurring period of the session
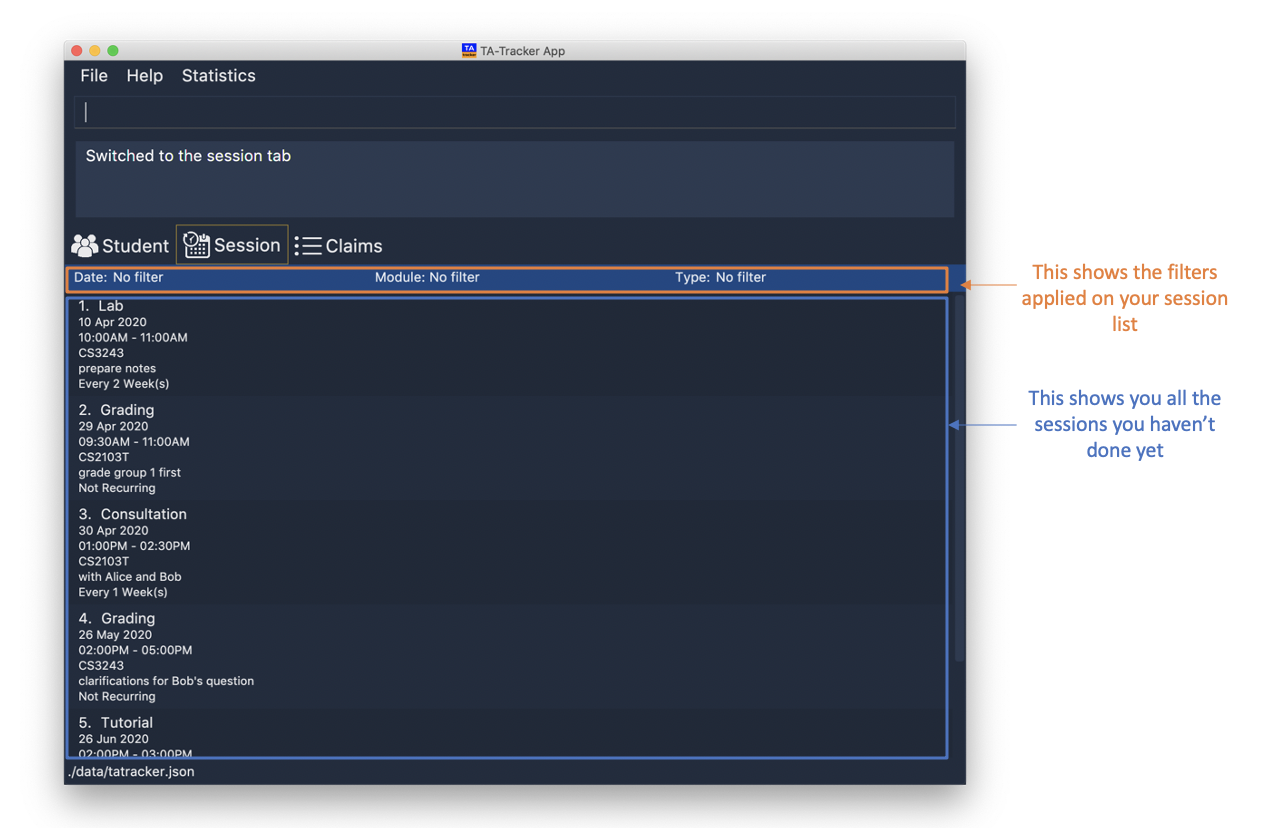
This is an example of what the Session View looks like.
Adding a Session : session add
(Contributed by Chua Yi Jing)
You can use this command to add a new session.
The new session will be shown in the Session View, and will automatically
be marked as not done.
If you were on a different tab, you will automatically be switched to the session tab.
Format: session add m/MOD_CODE [s/START] [e/END] [d/DATE] [w/WEEKS] [t/SESSION_TYPE] [n/NOTES]
|
Examples:
-
session add m/CS3243 s/14:00 e/16:00 d/2020-06-20 w/2 t/consultation n/with Alice and Bob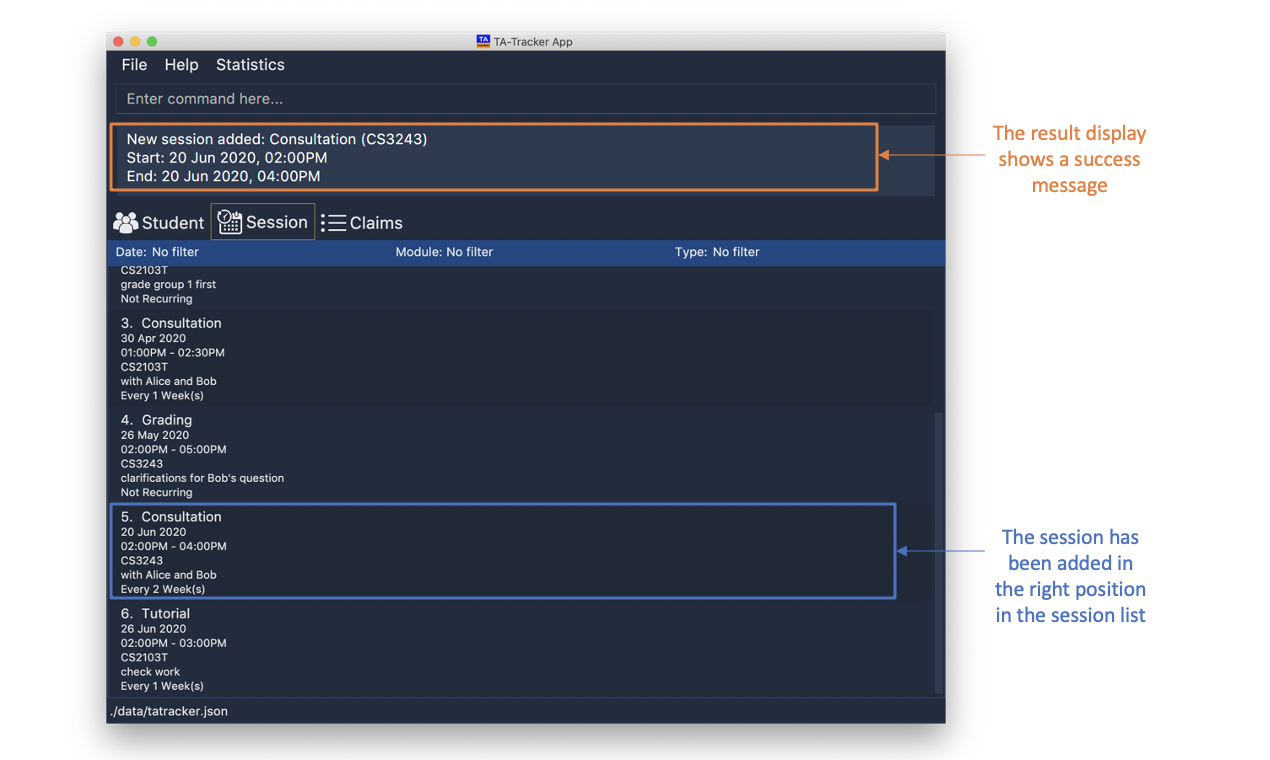
Adds a new session with:
-
START_TIMEat 14:00 in24hrformat -
END_TIMEat 16:00 in24hrformat -
DATEon 2020-06-20 inyyyy-MM-ddformat -
WEEKrecurring period of 2 weeks: Once this session has been marked as done, a new session will be created withDATE d/2020-07-04(2 weeks later from the date of the original session) -
MOD_CODEof CS3243 -
TYPEconsultation -
NOTE"with Alice and Bob"
-
Deleting a Session : session delete
(Contributed by Chua Yi Jing)
You can use this command to delete a session at a specific index.
If you were on a different tab, you will automatically be switched to the session tab.
Format: session delete INDEX
|
Do not confuse the |
Examples:
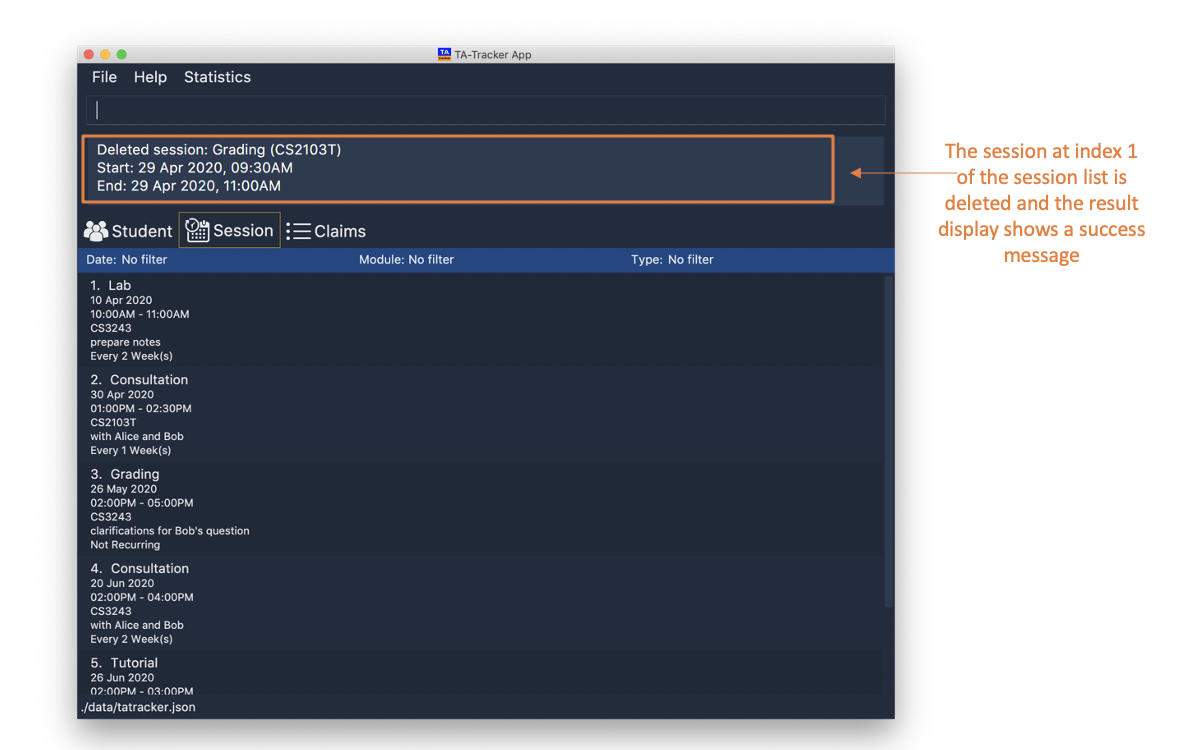
-
session delete 1This command deletes the first session in the Session View.
Marking a Session as Done : session done
(Contributed by Fatin and Chua Yi Jing)
You can use this command to mark a session as done.
The session marked as done will be removed from the Session View and will automatically appear as a new claim in the Claims View. If the session marked done has a recurring period, a new session with the updated date and timing will be added to Session View.
If you were on a different tab, you will automatically be switched to the claims tab.
Format: session done INDEX
Marks the session with the given unique index as done.
Examples:
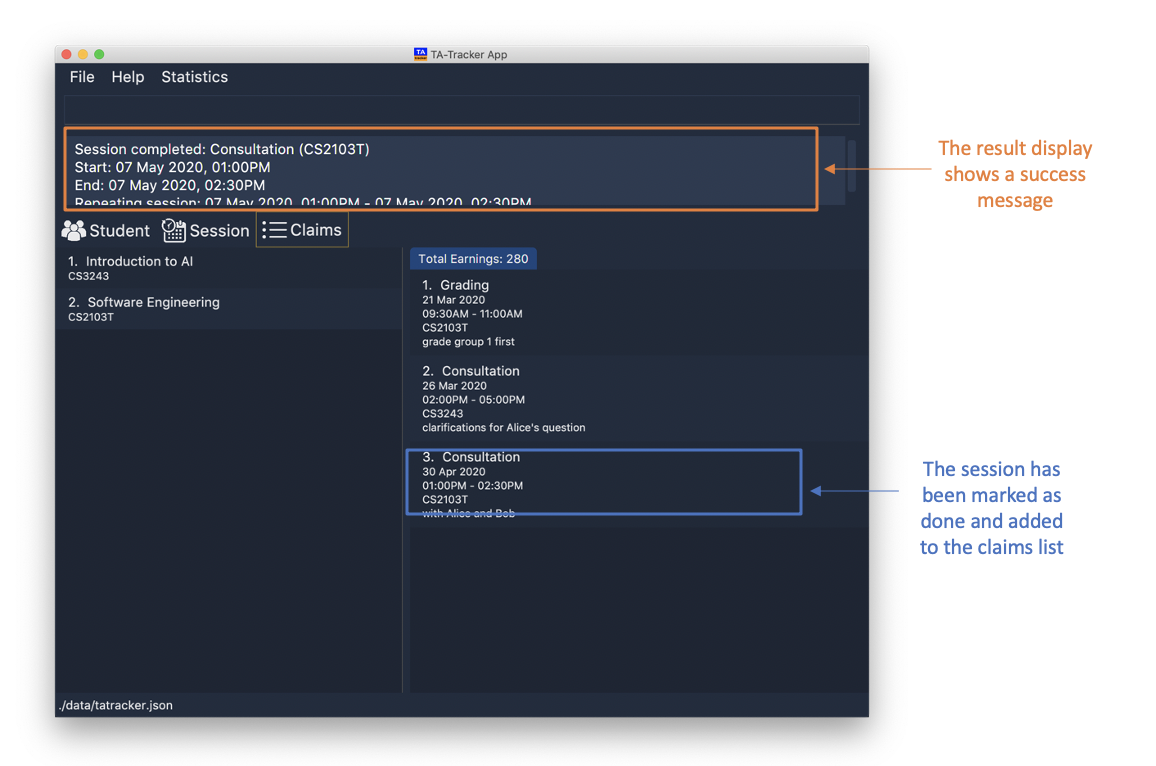
-
session done 2
This will mark the 2nd session in the Session View as done.
Filter : session filter
(Contributed by Chua Yi Jing)
You can use this command to filter the sessions in the Session View.
You can filter the sessions in the following ways:
-
MOD_CODE- filtering by module code will show you only the sessions affiliated with that module. -
SESSION_TYPE- filtering by session type will show you only the sessions with the specified type. -
DATE- filtering by a date will show you only the sessions on that date.
When you use multiple filters, the filters will have an or relationship. For example,
for the command session filter m/CS3243 t/grading you will be shown sessions that
either belong to the module CS3243 or are of type grading.
When you execute a new filter command, any previous filters applied on the sessions will be removed and only the filters from the latest command will be applied on the sessions list. The filters that are currently being applied are shown at the top of the Session View
If you were on a different tab, you will automatically be switched to the session tab.
Format: session filter [m/MOD_CODE] [t/SESSION_TYPE] [d/DATE]
Example:
-
session filter m/CS3243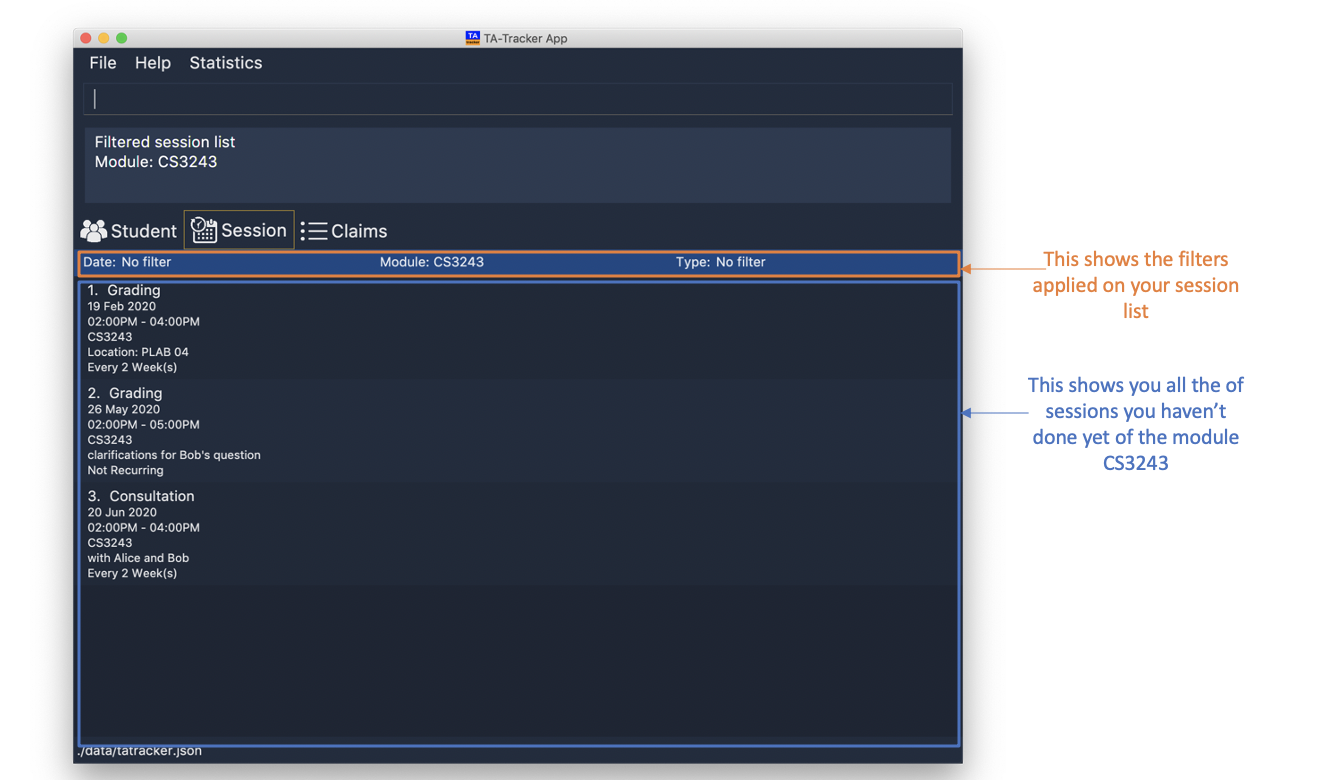
All sessions in the Session View with module code
CS3243are displayed. -
session filter m/CS3243 t/grading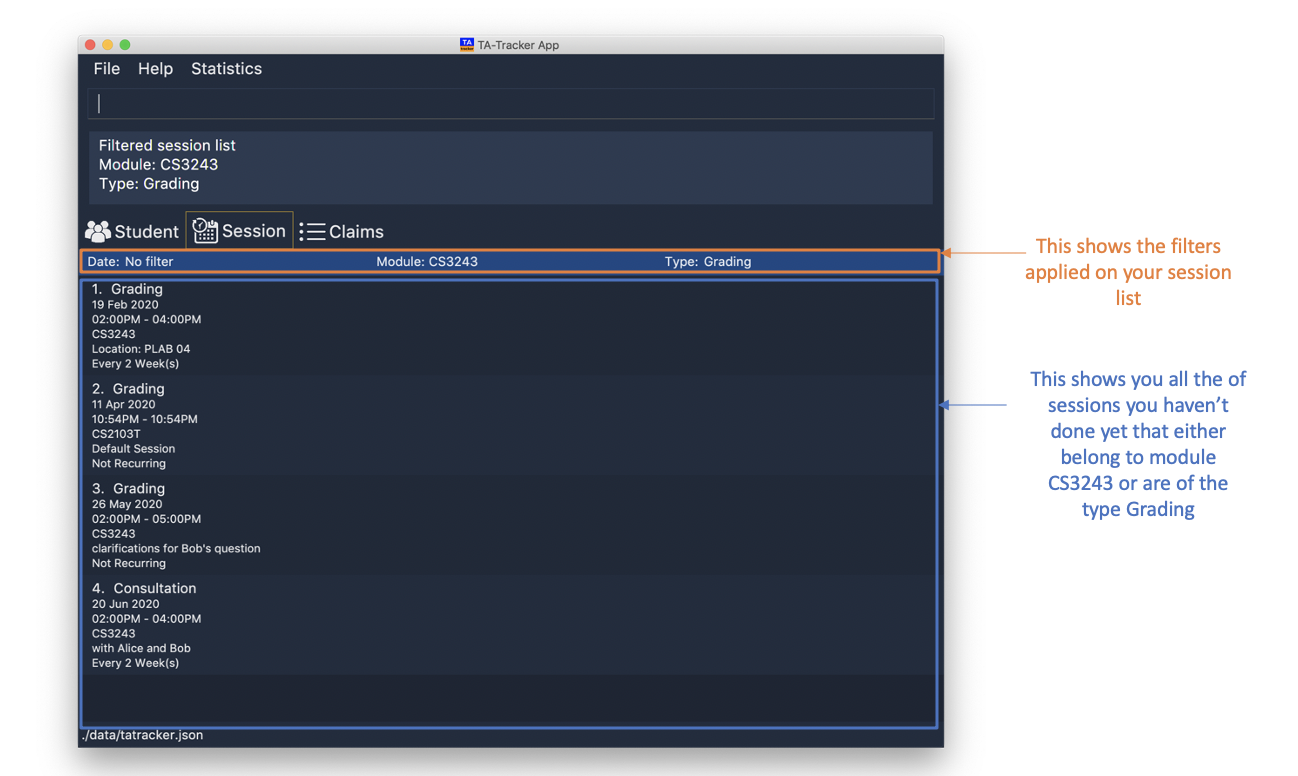
All sessions in the Session View with module code
CS3243, or session typeGradingwill be shown.
|
As long as a session contains any one of the keywords given by the user, the session will be shown to the user. |
Filter : claims filter
(Contributed by Chua Yi Jing)
You can use this command to filter sessions in the Claims View by the module code.
You will see the module with the specified MOD_CODE highlighted in orange in the list.
All completed sessions with matching MOD_CODE are displayed. Keyword is case-insensitive.
Format: claims filter m/MOD_CODE
Example:
-
claims filter m/CS3243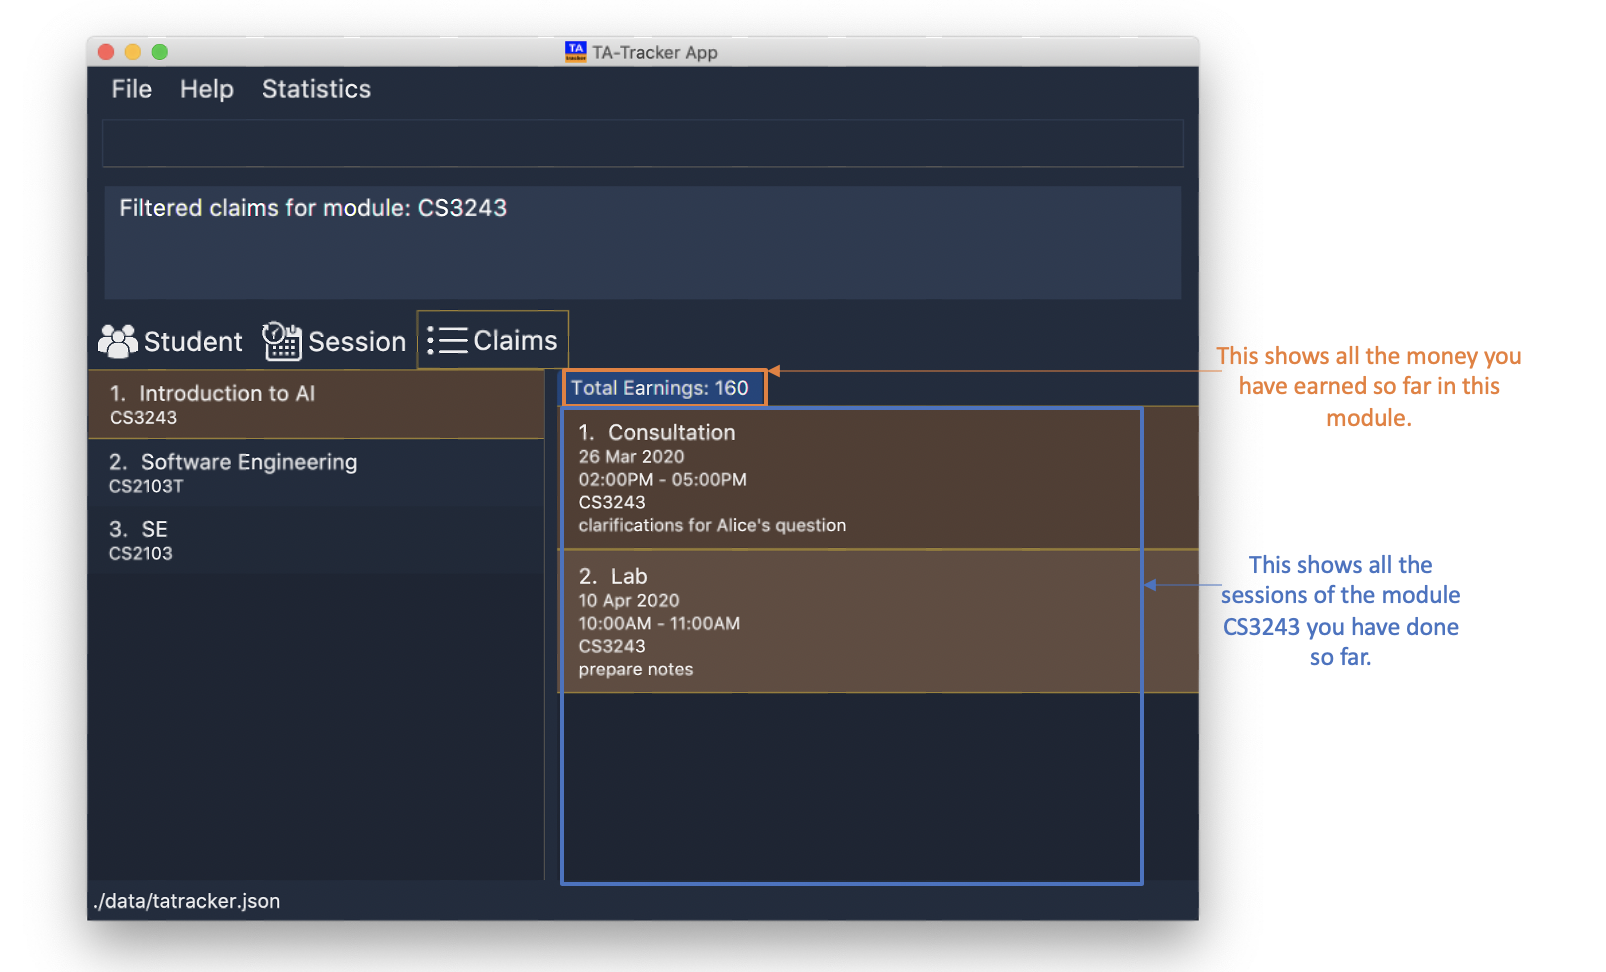
All sessions in the Claims View with module code
CS3243are displayed.
Contributions to the Developer Guide
In addition to a User Guide, we wrote a Developer Guide targeted at developers who are interested in contributing to the project. The Developer Guide showcases my ability to write technical documentation and the technical depth of my contributions to the project. Given below is my contribution to the Developer Guide:
Session View
(Contributed by Chua Yi Jing)
Session View is the term used to refer to the view that contains a list of all sessions that haven’t been completed yet.
Model Framework
(Contributed by Haoyi)
The following Class Diagram shows how different classes are related in the functioning of the Session View.
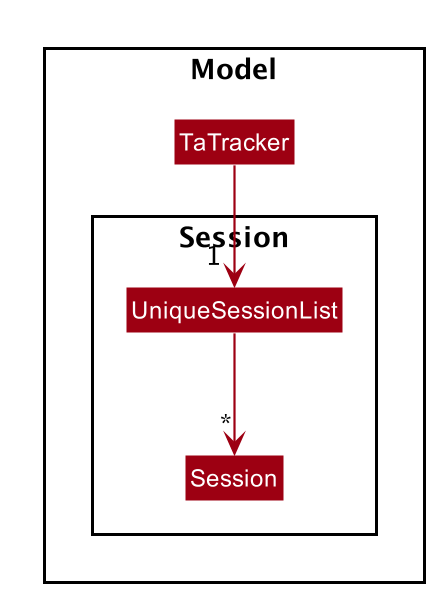
The TA-Tracker model class contains a UniqueSessionList which helps keep track of
all the sessions in TA-Tracker
that have not been marked as done.
Implementation of the Session Done Command
(Contributed by Chua Yi Jing)
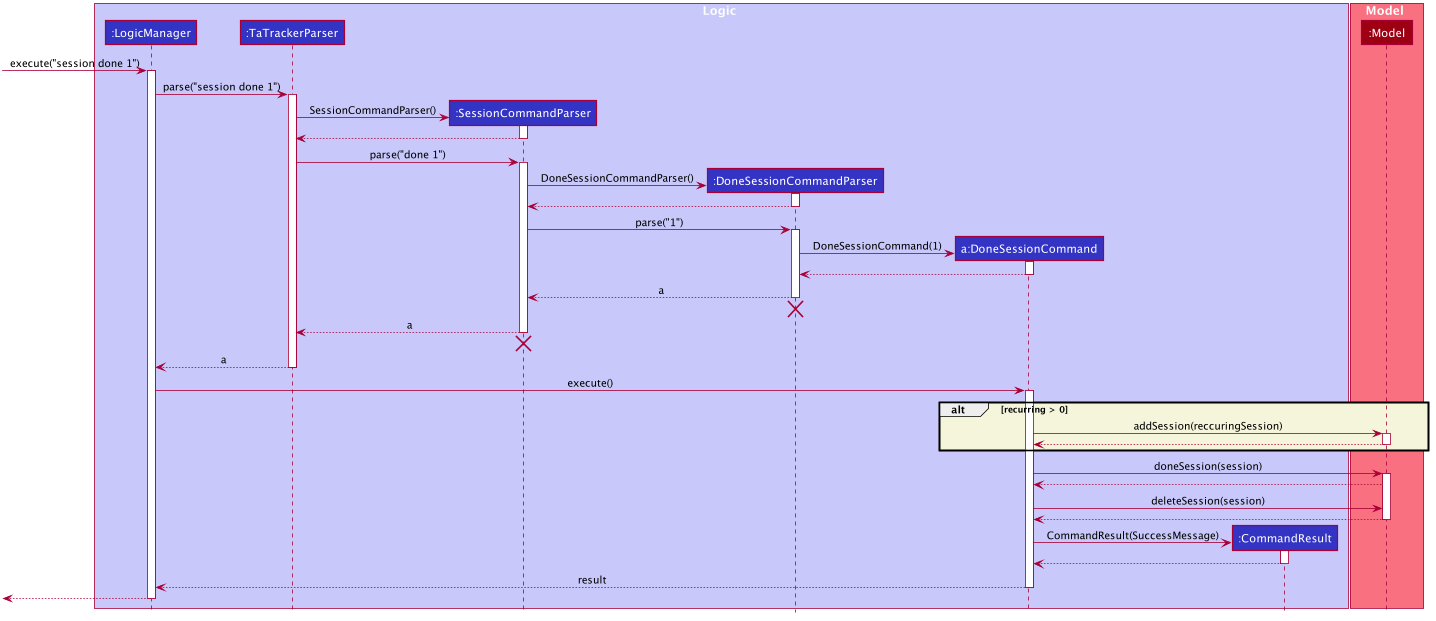
The following Sequence Diagram shows the sequence of commands that take place between
the Logic and Model components of the TA-Tracker
when the user enters the command
session done 1.
|
-
The
LogicManageruses theTaTrackerParserto first parse the user command. -
The
TaTrackerParsersees that the command is aSessioncommand and passes the command to theSessionCommandParser. -
The
SessionCommandParsersees that the command is aDoneSessionCommandand passes the arguments to theDoneSessionCommandParser. -
The
DoneSessionCommandParsercreates aDoneSessionCommandwith the given index. -
LogicManagercallsDoneSessionCommand#execute()method. -
The
DoneSessionCommandchecks whether the current session called by the user has a recurring period.-
If it does, a new session with the updated date will be added to
Model#UniqueSessionList(). -
If it does not have a recurring period, it will move on to Step 6.
-
-
The current session is marked as done and will be removed from
Model#UniqueSessionList. -
The updated session list will be displayed to the user.
(Contributed by Fatin)
The following Activity Diagram describes how TaTracker is updated when a SessionDone command is entered.
Implementation of Session Add, Edit and Delete
(Contributed by Chua Yi Jing)
The session edit and session delete commands have been implemented in a similar manner
to DoneSessionCommand.
The session add command has been implemented in a similar way. The main difference is that the
SessionAddCommand checks whether an object with the given module code exists in the TA-Tracker.
-
If no such module code exists, the session is created successfully.
-
If it doesn’t exist, an exception is thrown saying that the given module code doesn’t exist.
Filter Command
(Contributed by Chua Yi Jing)
Description
Different view has its own designated filter command.
-
Student View, has the
student filter -
Session View, has the
session filter -
Claims View, has the
claims filter
Implementation
This section describes the implementation of the filter command.
The Activity Diagram below summarises what happens when the user executes a filter command:
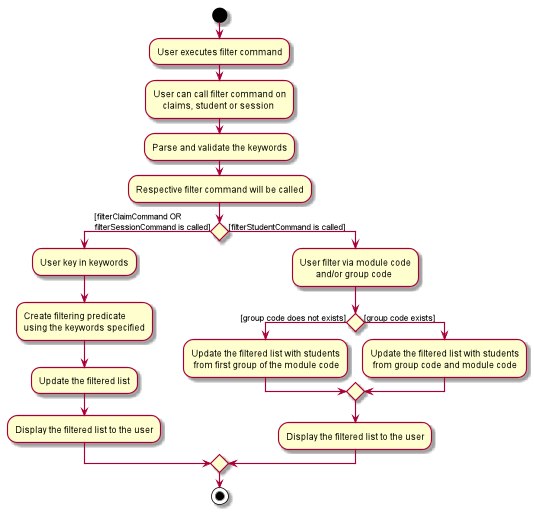
The filter feature consists of three main steps:
-
Validating and parsing user input
-
Creating a filtering predicate from user’s input
-
Updating the filtered list with the filtering predicate
Filter under Student View
Students are filtered based on the module code and/or group code given by the user.
Module code is a compulsory parameter for the user.
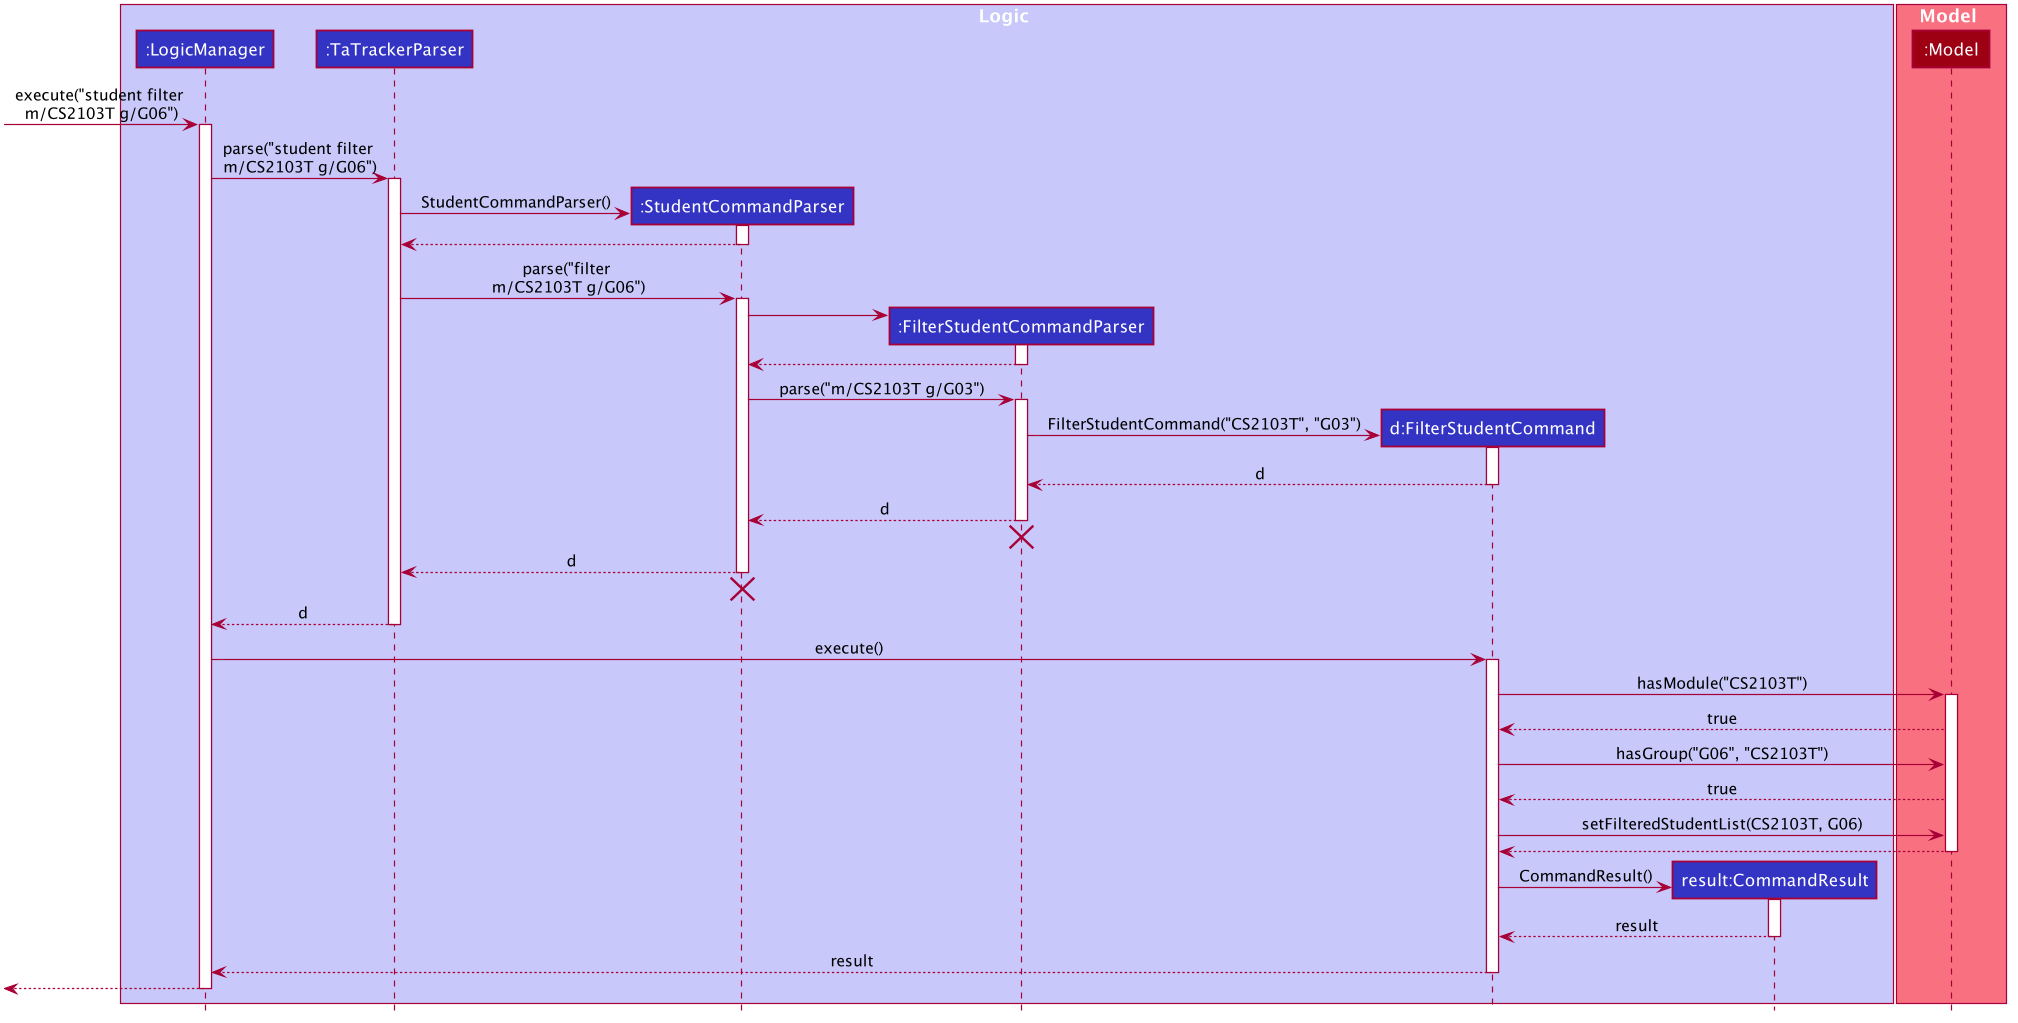
The following Sequence Diagram shows the sequence of commands that take place between
the Logic and Model components of the Ta-Tracker when the user enters the command
student filter m\CS2103T g\G06. This command will return students from module code CS2103T, under group G06.
|
Given below is an example scenario where the user enters a command to filter students.
-
The user command is passed through the
LogicManagertoTaTrackerParser.TaTrackerParserchecks the input arguments and identify the String keywords. -
The
TaTrackerParsersees that the command is a type of Student and passes the command to theStudentCommandParser. -
The
StudentCommandParsersees that the command is a type of filter and passes the arguments to theFilterStudentCommandParser. -
The
FilterStudentCommandParsercreates aFilterStudentCommandobject with the relevant keywords. -
LogicManagercallsFilterStudentCommand#execute(). -
The
FilterStudentCommandobject checks whether any of the keywords given by the user matches the existing module and/or group.-
If it doesn’t, a
CommandExceptionis thrown saying that no such students exists. -
If it does, the
FilterStudentCommandreturns aCommandResultwith a success message.
-
Filter under Session View
Sessions can be filtered with the following parameters:
-
d/DATE -
m/MODULE CODE -
t/SESSION_TYPE
These parameters can be used alone or together.
The command used to filter sessions has been implemented in a similar way. The main
difference is that the FilterSessionCommandParser creates a SessionPredicate object.
The SessionPredicate object updates the filtered session list by keywords in Model.
The filtered list will then be displayed.
When the user specifies a keyword, sessions that contain the keywords will be filtered and shown to the user.
If none of the keywords supplied by the user appears in any sessions, a CommandException
will be shown.
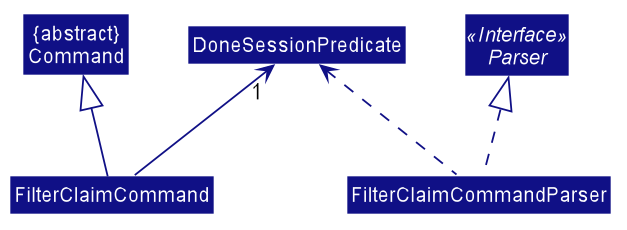
The following Class Diagram shows how different classes are related in the functioning of
the SessionFilter Command.
Filter under Claims View
The user can only filter the Claims View by module code.
When the user enters the command claims filter m/MODULE_CODE, claims that contain the module code
will be filtered.
The command used to filter claims is implemented the same way as SessionFilterCommand.