Overview
TA-Tracker is a productivity tool made for NUS School of Computing Teaching Assistants (TAs). Rather than using several excel spreadsheets or notes, TA-Tracker enables TAs to manage their students and track teaching duties in a single, convenient-to-use platform . The application is mainly written in Java and spans a considerable 20k Lines of Code. With a rigorous system of checks and tests put in place, users can be assured that the codebase is well-maintained, and that the code quality is consistently high. A comprehensive set of guides are also provided to ensure a smooth on-boarding process for both users and contributors alike.
Summary of contributions
As the main developer of the application’s User Interface (UI), I play a crucial role in integrating the features my
teammates create with the UI. During group discussions, I placed extra emphasis on guiding my teammates to engineer
solutions that could be more easily assimilated into the UI, to ensure that their work becomes user-visible. As a
result, my team was able to morph the given codebase from a trivial application into a polished product.
With the substantial amount of experience I gained while designing the application, I was available and prepared to help
out with various tasks, like design considerations and debugging. As the most experienced UI developer in the team, I
was highly involved in helping my teammates become more familiar with JavaFX and CSS. My role in the development of the
project was especially crucial, as I enabled my teammates to be able to display all the hard work that they have put
into the development of their respective features to the users. My major contributions are as follows:
Updated the User Interface
The UI is at the heart of TA-Tracker, displaying the output of TA-Tracker to the user visually. As the main contributor
to the MainWindow of the UI, I play an integral role in ensuring that the content is being displayed to the user
correctly, while keeping the interface simple and informative. I changed the overall layout of TA-Tracker by adding
tabs and icons (#120
, #182
, #227
), and by creating all the ListPanels and their respective ListCards (#120
, #182
, #204
).
I also took care to ensure that the information displayed was integrated with the BackEnd whenever my
teammates made new contributions to the application, such as adding new fields (#322
) or commands (#330
). A Total
Earnings label in the Claims Tab was also added to improve user experience, as money makes the world go round (#243
, #322
).
Enabled highlighting of applied filters
As TA-Tracker was initially based on AB3, the UI at the beginning of the project looked plain and dull. Instead of
indiscriminately adding colours to TA-Tracker, I favoured a different approach, and enabled the relevant ListCells in
the Student Tab and Claims Tab to be highlighted whenever filter commands were entered (#210
, #227
, #235
, #238
). This
not only made a huge improvement in the visual differences between TA-Tracker and AB3, but also enabled users to better
focus on the information displayed.
This contribution also required extensive debugging and improvements to the inner workings of the FilterCommand, which
was a rather challenging command to implement (#243
, #314
, #322
). In the Session Tab, highlighting the ListCells was a
less favourable option, since there was only one ListPanel to display. I overcame this challenge by creating a filter
header (#322
).
Implemented relevant commands to improve User Experience
Goto Command : To achieve the goal of making TA-Tracker a keyboard-only application, I implemented the GoToCommand
to allow users to switch between tabs via the command-line rather than clicking on the tab-headers (#189
).
In a similar spirit, I enabled switching to relevant tabs for all commands, to better the user experience. This allows
new information to be displayed instantaneously upon entering a command (#189
, #210
, #212
). This involved
creating an enum for UI handling in CommandResult (#189
, #212
) and as a result, the painstaking process of updating the
entire code-base.
SetRate Command : The hourly pay rate for all the displayed Earnings was initially set to $40, which is the rate at
which the majority of TAs are being paid. Based on feedback from the PE Dry-Run, I created a command to change this value
due to the possibility of changes being made to the hourly pay rate. (#321
)
Other contributions
Here is the code that I have written for this product: [All commits] [RepoSense]
Contributions to the User Guide
Given below are sections I contributed to the User Guide. They showcase my ability to write documentation targeting end-users. |
Command Format
(Contributed by Fatin and Gabriel)
This section shows you how all the commands in this guide have been formatted.
| Format | Meaning | Example |
|---|---|---|
Any lower case letters, followed by a forward slash |
These are prefixes. They are used to separate the different parameters of a command. |
These are prefixes: Note that prefixes cannot have spaces: |
Words in upper case |
These are parameters. You will need to supply parameters in order to complete certain commands. |
You can create a student with the name John Doe using the Suppose the Simply replace |
Words in upper case, surrounded by square brackets |
These are optional parameters. Certain commands can be used without these parameters. |
Suppose a command contains two parameters next to each other: The first parameter Since a
|
An ellipsis |
These are parameters that can be used multiple times or none at all. |
The following parameter can be used multiple times: This means that it can be:
|
Layout
(Contributed by Fatin)
This section gives you a brief overview of the layout of the TA-Tracker.
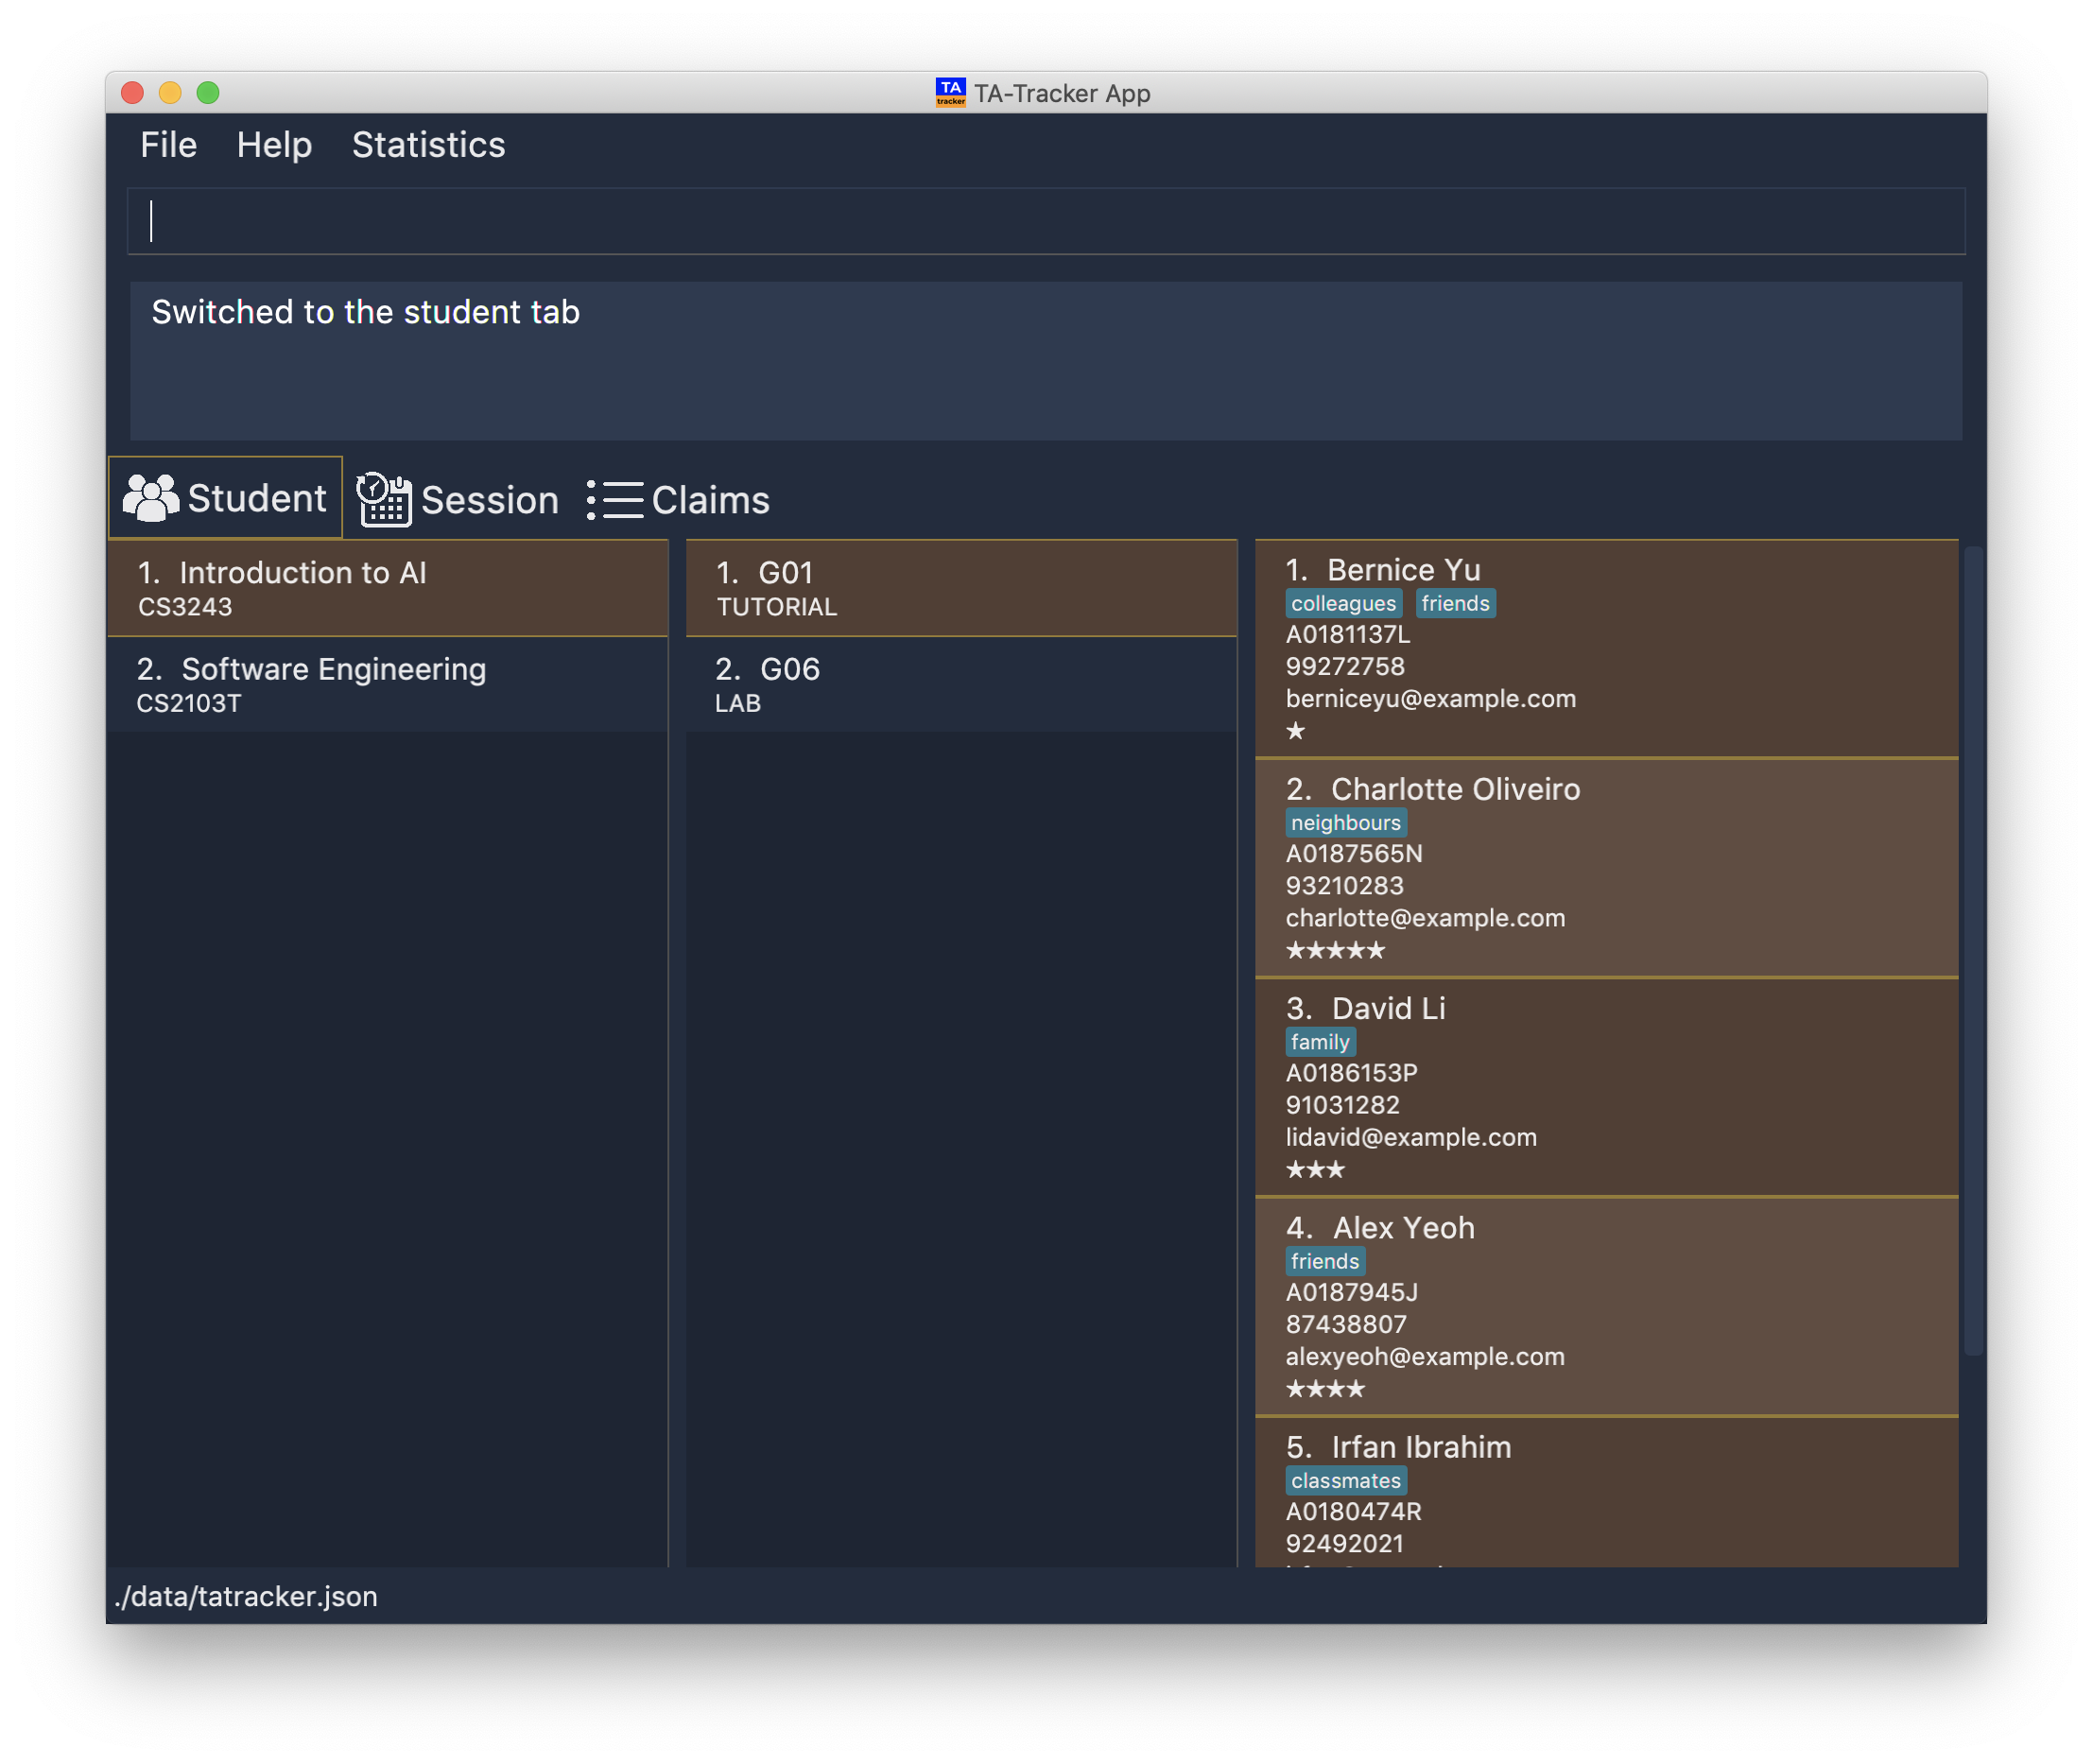
TA-Tracker is divided into three tabs representing the different Views:
-
The Student View under the
student tab, -
The Session View under the
session tab, and -
The Claims View under the
claims tab
When you switch to a tab, that tab will be highlighted in orange.
Furthermore, when you enter a new command, you will be automatically switched to the relevant tab
so that you can instantly see the result of the command.
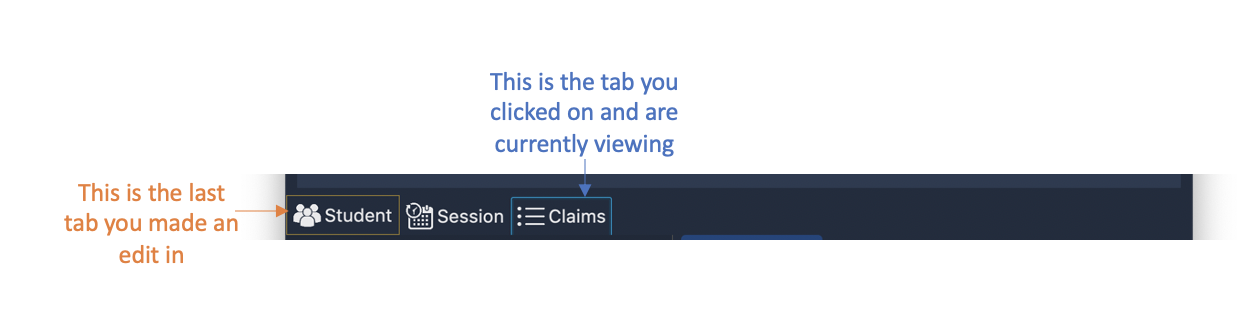
This shows what happens when you last made a change in the |
Claims View
(Contributed by Fatin)
Under the claims tab, the Claims View contains a list of all the claimable teaching
duties you have completed so far.
The purpose of this view is to allow you to keep track of all your claims so you can easily enter it into the TSS claims form at the end of the semester.
The Claims View has been divided into two columns.
-
The first column shows you a list of all the modules that you are a teaching assistant for.
-
The second column shows you a list of all the sessions that you have marked as done.
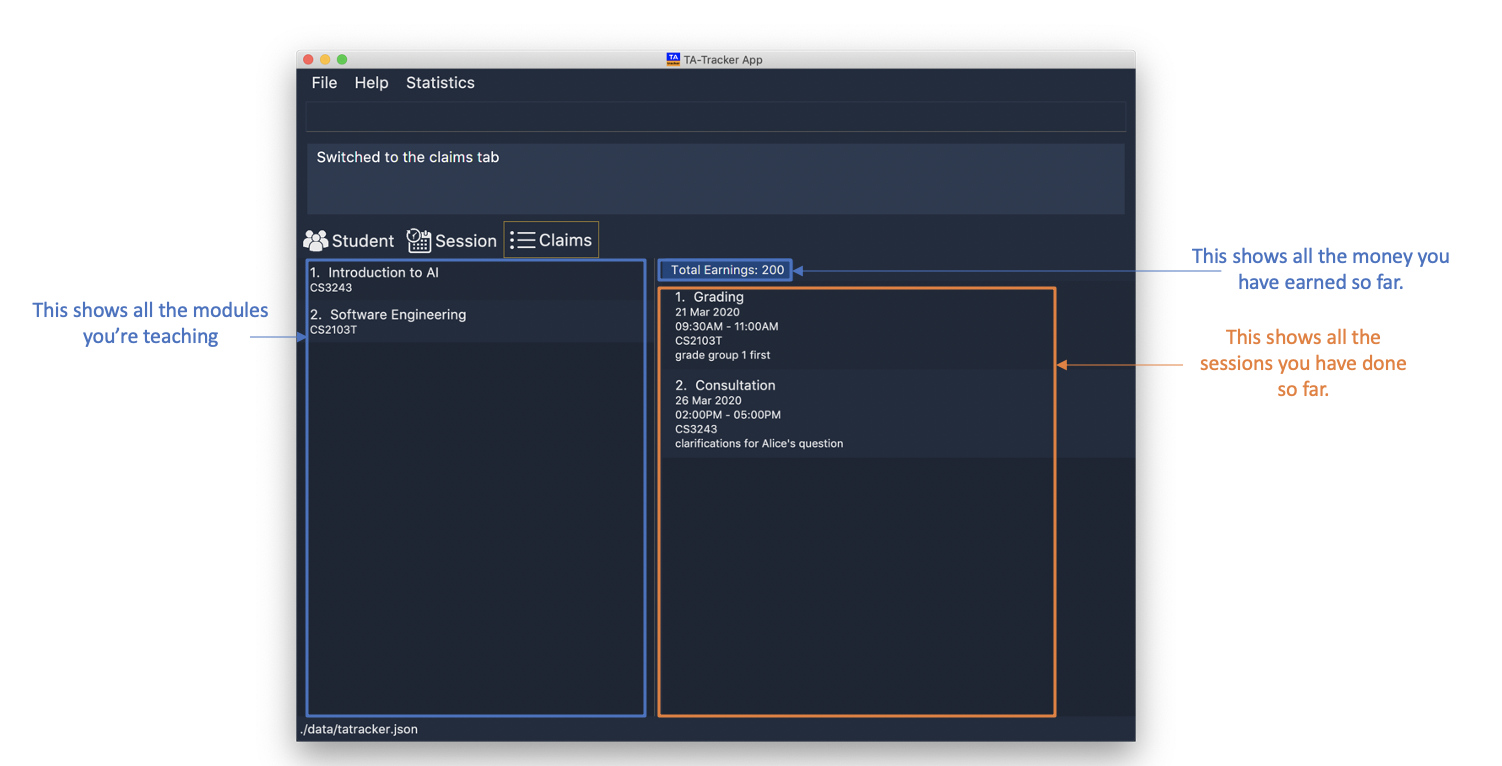
This is an example of what the Claims View looks like.
Viewing help : help
(Contributed by Fatin)
You can open the help window with this command. You can close the help window
by pressing the ESC key
on your keyboard.
Format: help
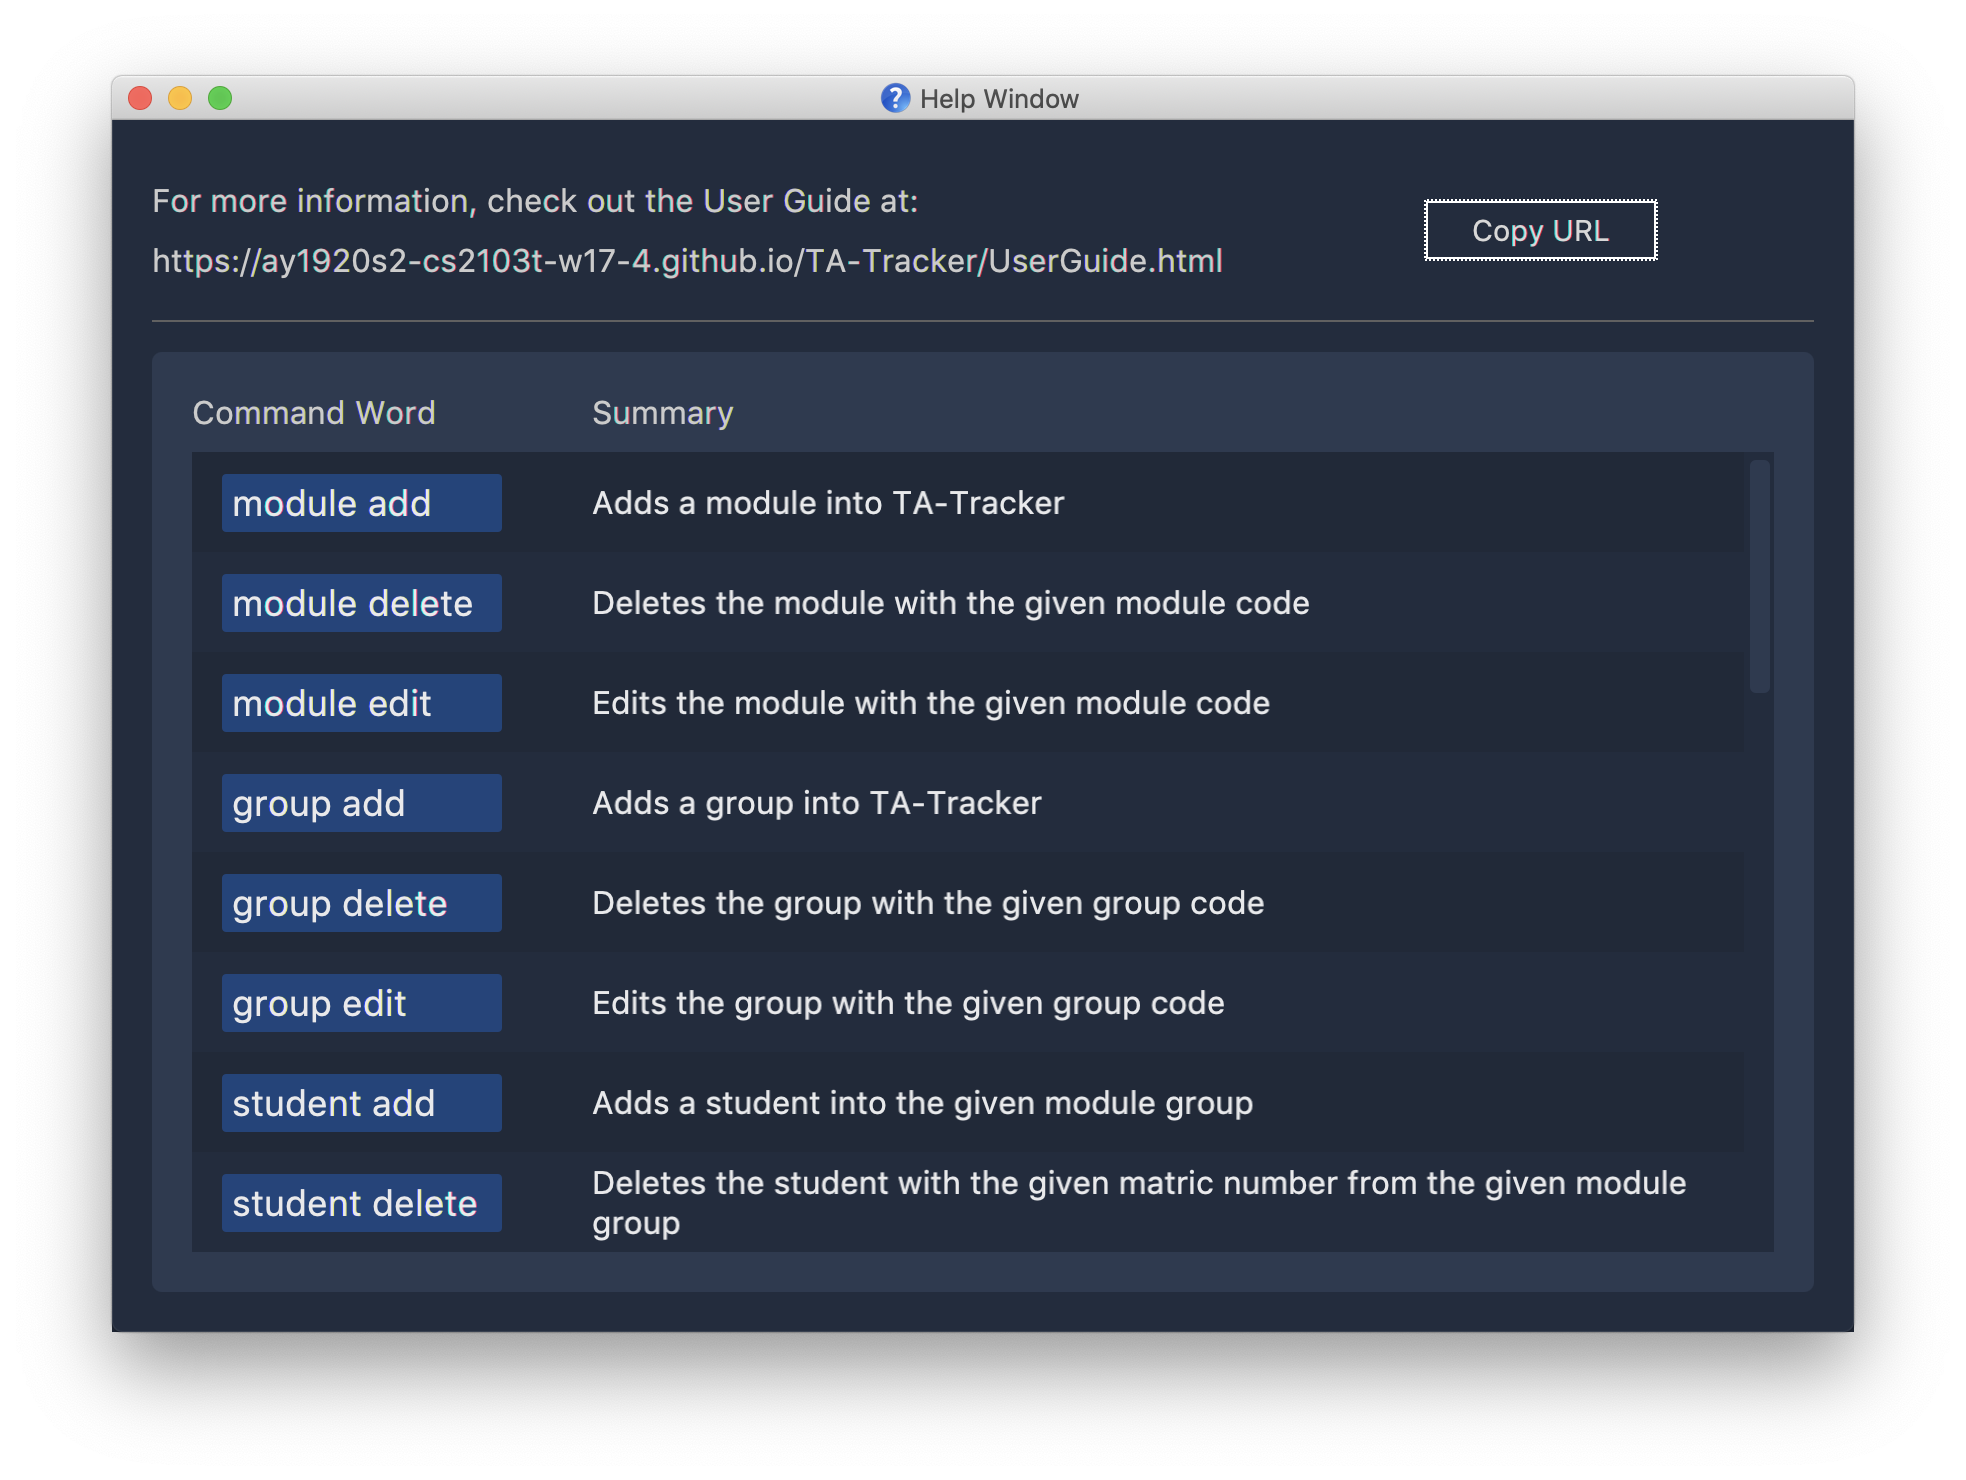
This is what the help window looks like.
Switching tabs : goto
(Contributed by Fatin)
You can switch to different tabs with this command to show their associated view.
Format: goto TAB_NAME
|
Example:
goto student
This command takes you to the student tab.
Changing the hourly rate : setrate
(Contributed by Fatin)
Sets the hourly rate for the total income and claim computation.
Format: setrate RATE
|
Examples:
-
setrate 25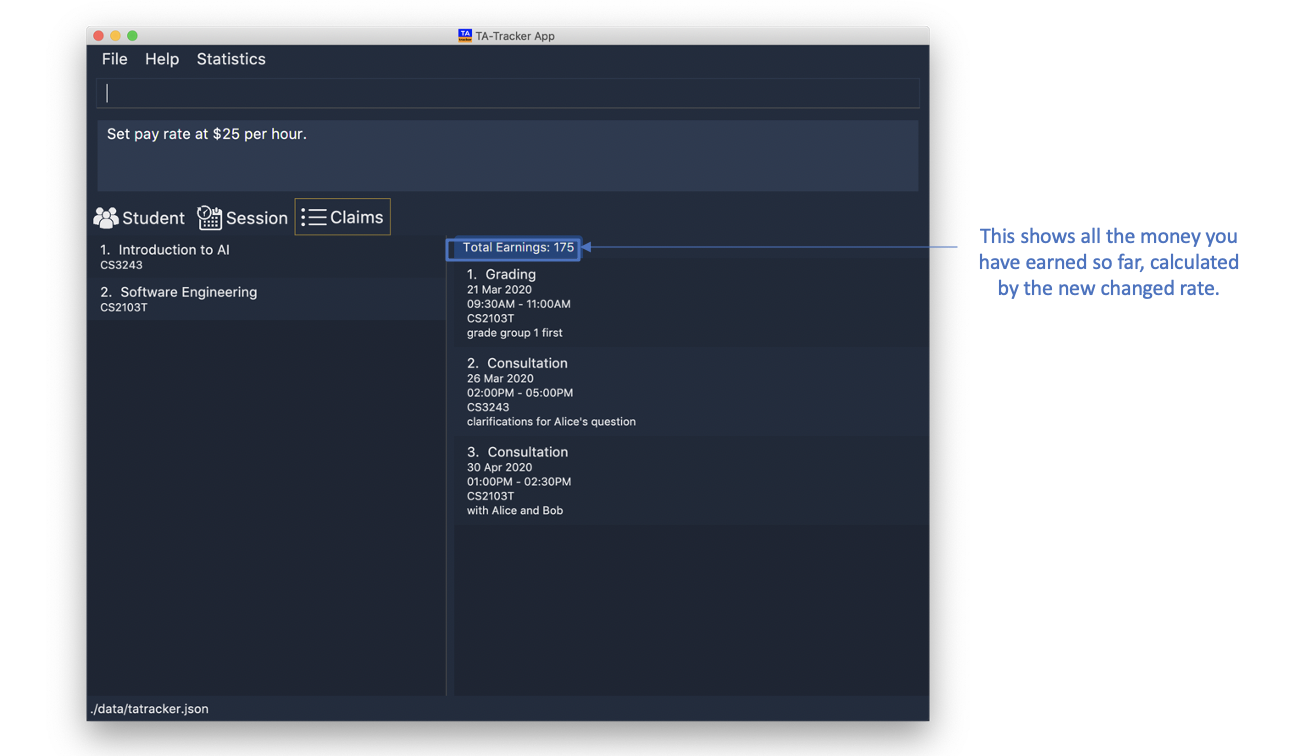
Sets the current hourly rate to $25.
Contributions to the Developer Guide
Given below are sections I contributed to the Developer Guide. They showcase my ability to write technical documentation and the technical depth of my contributions to the project. |
UI component
(Contributed by Fatin)
The Class Diagram below shows how the UI components interact with each other.
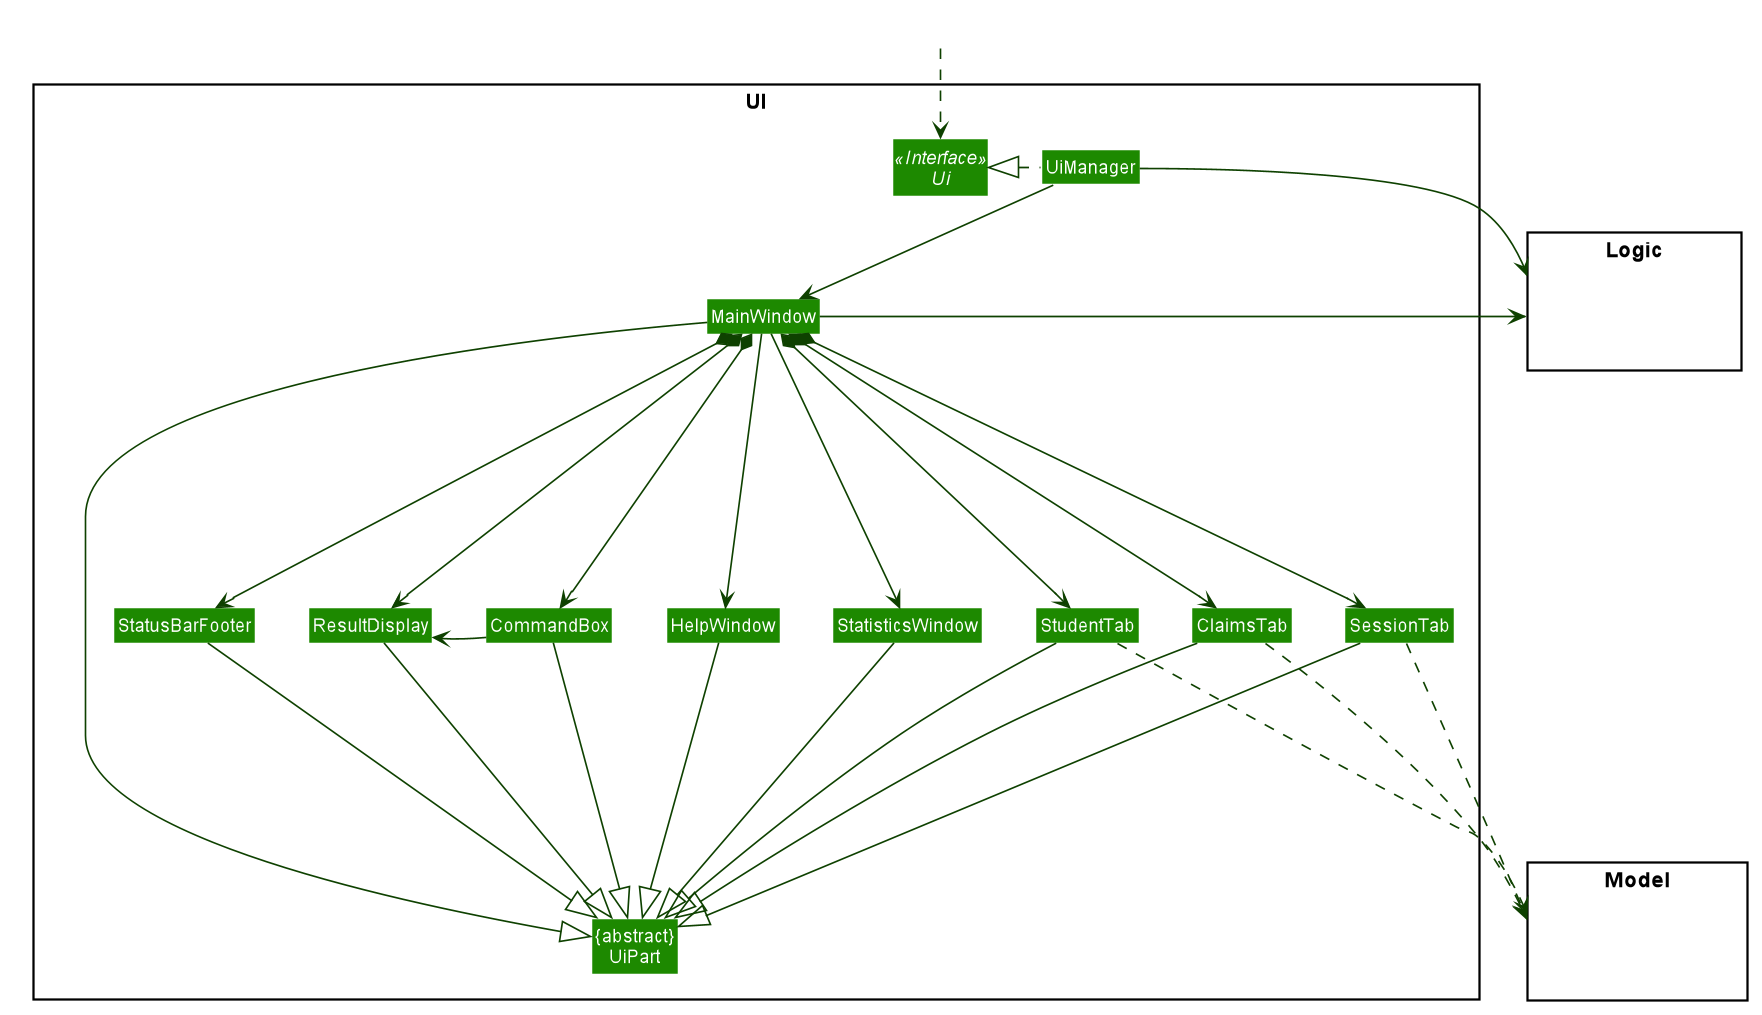
API: Ui.java
The UI consists of a MainWindow that is made up of parts e.g. CommandBox, ResultDisplay,
StudentTab, StatusBarFooter etc. The UI also contains 2 more windows, namely:
-
the
HelpWindowand -
the
StatisticsWindow
The UI component uses JavaFx UI framework. The layout of these UI parts is defined in
matching .fxml files that are in the src/main/resources/view folder. For example, the
layout of the MainWindow is
specified in MainWindow.fxml
The UI component,
-
Executes user commands using the
Logiccomponent. -
Listens for changes to
Modeldata so that the UI can be updated with the modified data.
Tabs
The Class Diagram below shows how the components in the Student Tab interact with each other.
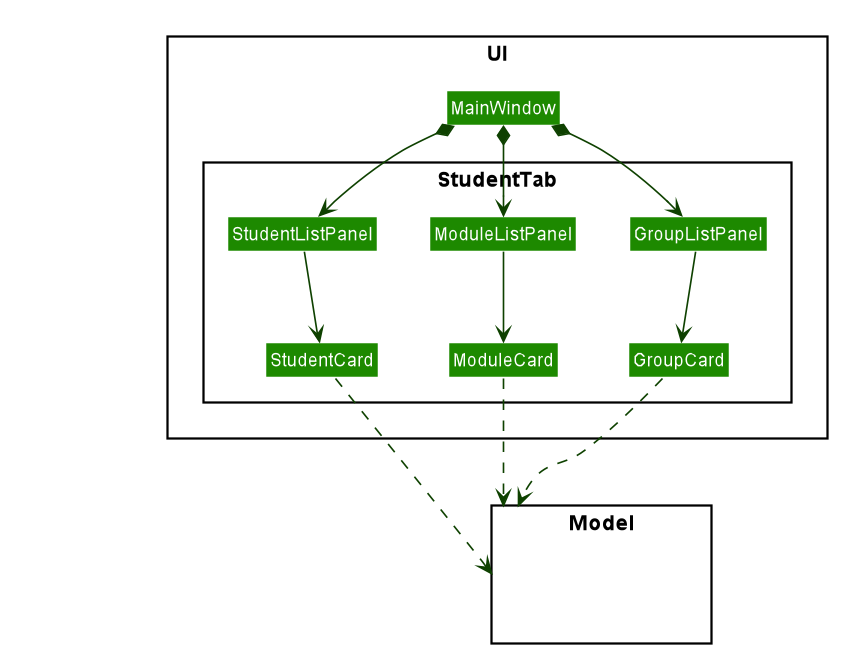
|
All the |
The UI contains 3 tabs:
-
The
Student Tab -
The
Session Tab -
The
Claims Tab
Each of these tabs consist of one or more List Panels (e.g. StudentListPanel) and its
respective Card (e.g. StudentCard). In each List Panel, the Graphics component of
each of the List Cells is defined by the respective Card.
The other 2 Tabs follow the same structure as the Class Diagram above.
Model component
(Contributed by Fatin)
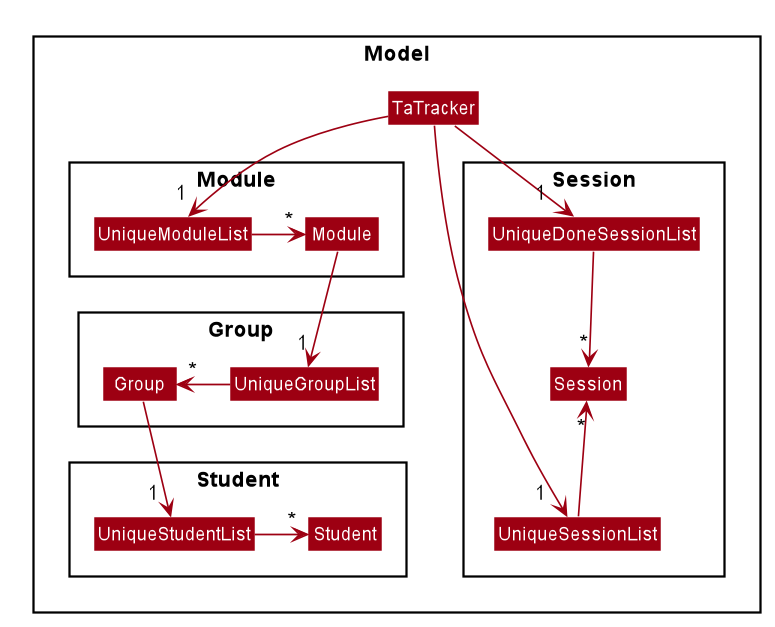
The following Class Diagram shows how the different Model components interact with each other.
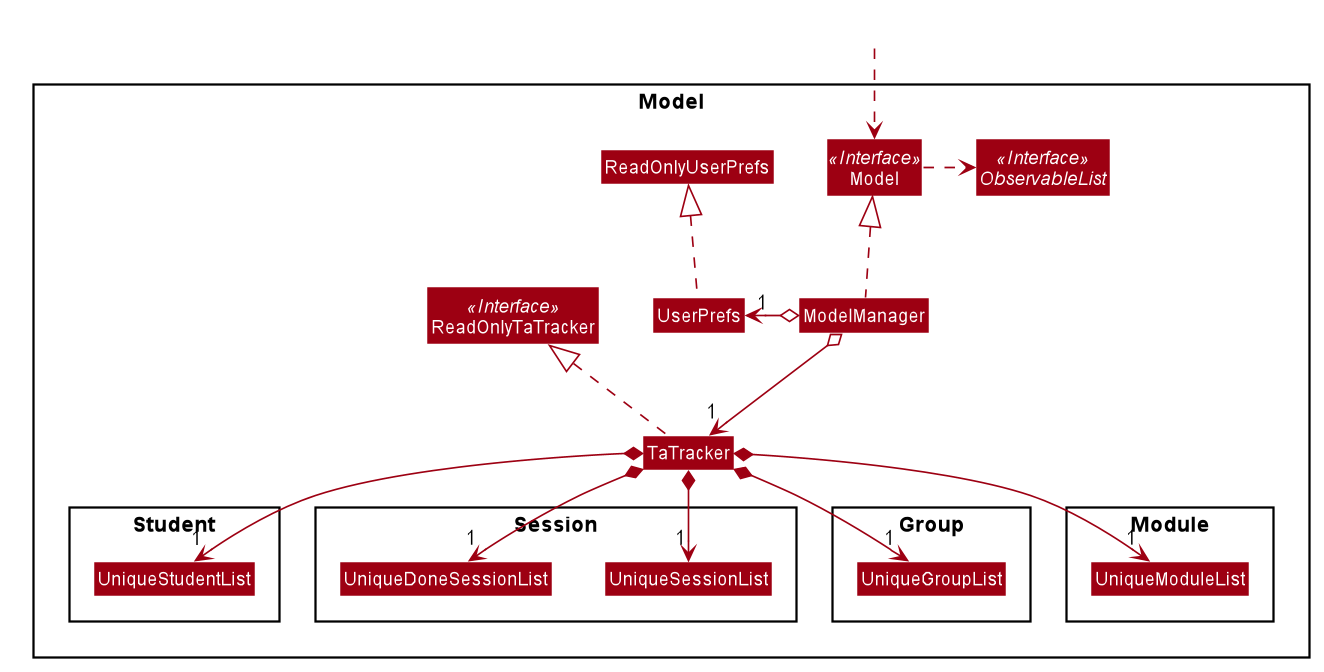
API: Model.java
The Model,
-
Stores a
UserPrefobject that represents the user’s preferences -
Stores the TA-Tracker data
-
Exposes 5 unmodifiable
ObservableList<>objects:-
filteredStudentList, which contains all theStudentsin the TA-Tracker -
filteredSessionList, which contains all theSessionsin the TA-Tracker that have not been marked as done -
filteredDoneSessionList, which contains all theSessionsin the TA-Tracker that have been marked as done -
filteredModuleList, which contains all theModulesin the TA-Tracker -
filteredGroupList, which contains all theGroupsin the TA-Tracker
-
-
These lists can be 'observed' e.g. the UI can be bound to this list so that the UI automatically updates when the data in the list change
-
Does not depend on any of the other three components
The following Class Diagram shows the relationship between the different classes
in the Model component.
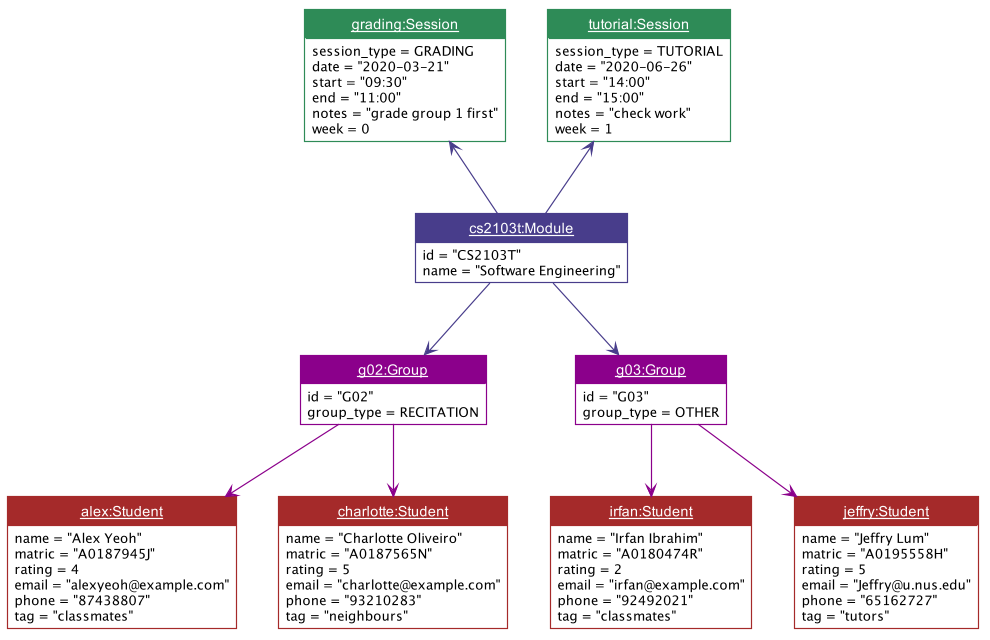
Example of Model Usage
The following Object Diagram shows an example of the relationship between the different Model objects.
This example is based on the state of TA-Tracker
when it is first run (without any user data).
Goto Command
(Contributed by Fatin)
Description
The goto command has been implemented to allow users to programmatically switch through the tabs using
the command line, rather than clicking on the tab headers.
The command can be utilised by entering goto TAB_NAME.
TAB_NAME is a compulsory parameter for the user.
Implementation
This section describes the implementation of the goto command.
The following Sequence Diagram shows the interactions between the Logic and UI components of
the TA-Tracker
when the user enters the command goto claims.
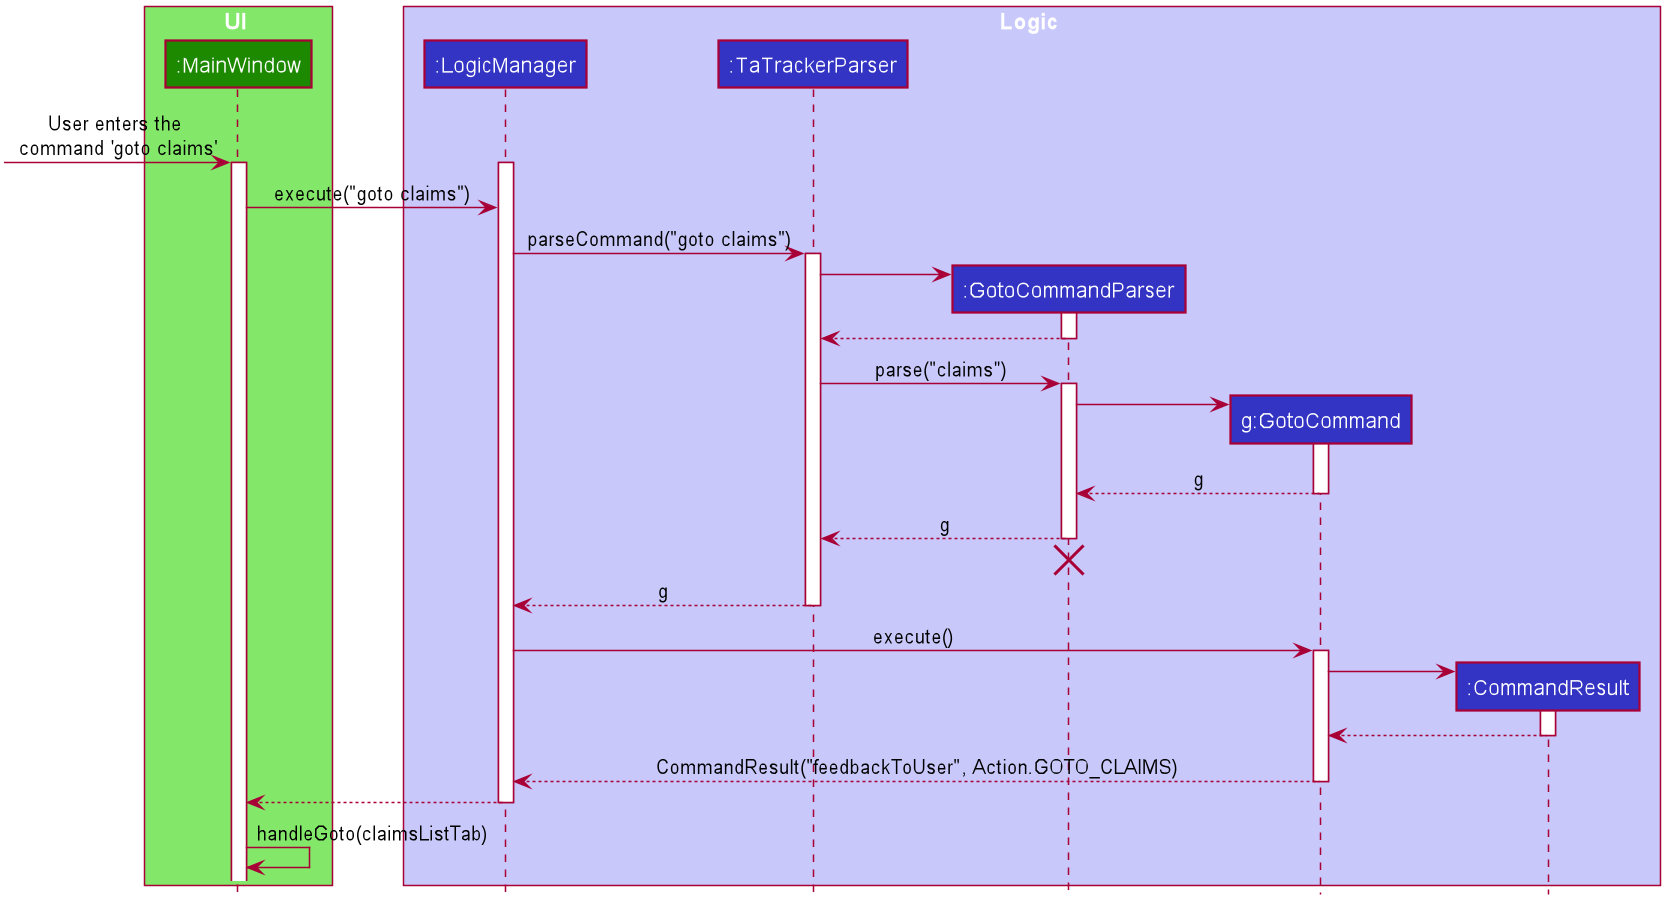
Given below is an example scenario where the user enters a command to switch to the Claims Tab.
-
The user command is passed through the
LogicManagertoTaTrackerParser.TaTrackerParserchecks the input arguments and identify the String keywords. -
The
TaTrackerParsersees that the command is aGotoCommandand passes the command to theGotoCommandParser. -
The
GotoCommandParsercreates aGotoCommandobject with the relevant keywords. -
LogicManagercallsGotoCommand#execute(). -
The
GotoCommandobject checks whether any of the keywords given by the user matches the existing tab headers.-
If it does, the
GotoCommandreturns aCommandResultwith a success message and an enum specifying how MainWindow should handle the next action. -
If it doesn’t, an exception is thrown.
-
-
MainWindowcalls the handleGoto() method to select theClaimsTabin theTabPane, completing the tab-switching process.
The following Class Diagram shows how different classes are related in the functioning of a Student Object.
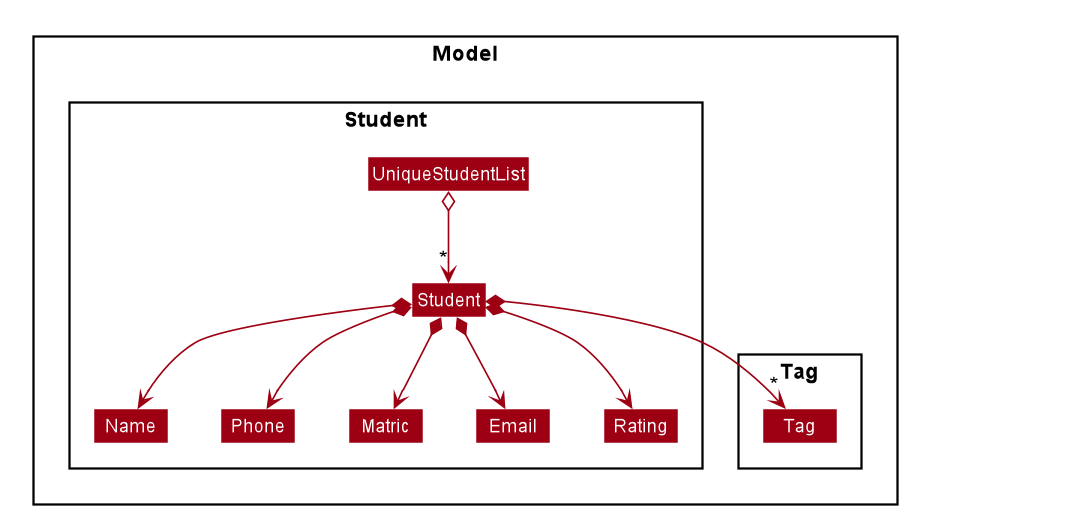
API: Student.java
The other models (Module, Group and Session) have been implemented in a similar manner.
The main difference is that the other models do not
have any Tags.
As a more OOP model, we can store a Tag list in TaTracker, which Student can
reference. This would allow TaTracker to only require one Tag object per unique
Tag, instead of each Student needing their own Tag object. An example of what
such a model may look like is given below.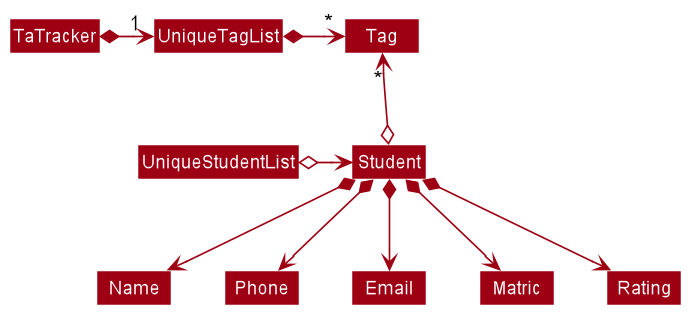
|
|
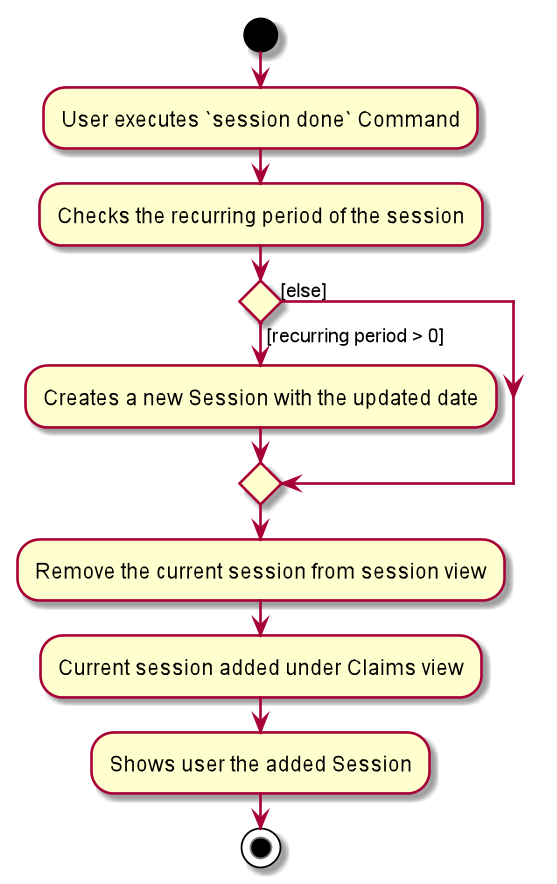
The above diagram assumes that a valid index has been input into the TA-Tracker during the done session command. |
Claims View
(Contributed by Fatin)
Claims View refers to the view that contains a list of all the sessions that have been done.
Model Framework
The following Class Diagram shows how different classes are related in the functioning of the Claims View.
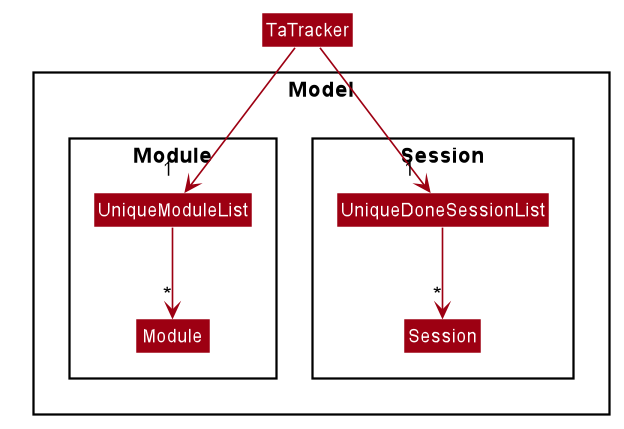
The TaTracker model class contains a UniqueDoneSessionList which keeps track of all the sessions that have been marked as done. Each of the sessions must belong to a Module in the UniqueModuleList.
Set Rate Command
Given below is an example scenario where the user enters the command setrate 50.
-
The user command is passed through the
LogicManagertoTaTrackerParser. -
TaTrackerParserchecks the input arguments and identify the String keywords. -
The
TaTrackerParsersees that the command is a type of SetRate and passes the command to theSetRateCommandParser. -
The
SetRateCommandParserobject checks that the givenRATEinput by the user is a valid integer. If it is, theSetRateCommandParsercreates aSetRateCommandobject with the relevant integer. -
LogicManagercallsSetRateCommand's execute method. -
MainWindowupdates theTotalEarningslabel in theClaimsTaband theStatisticsWindow