PROJECT: TA-Tracker
Overview
TA-Tracker is a productivity tool made for NUS Computing Teaching Assistants (TAs) who want to be able to track and manage all of their claimable hours and the students they are teaching in one place.
Summary of contributions
-
Major Enhancement: Syntax Highlighting
This feature highlights the user input whenever it changes in the
CommandBox. In addition, usage hints will appear in theResultDisplayas the user is typing out a command-
Justification: Since our target users are fast typers, this feature helps them to quickly identify and correct their input as they are typing. Furthermore, they will not need to remember how to use the commands, especially those with many parameters.
-
Highlights: Implementing this feature was very time-consuming. It required the creation of many utility classes and a decent understanding of regex patterns.
-
-
Major Enhancement: The Student Commands
I created the following three commands:
AddStudentCommand,DeleteStudentCommand, andEditStudentCommand-
Justification: Since our target users are Teaching Assistants (TAs), these commands allow them to store and update the details of the students that they are teaching.
-
Highlights: These commands were challenging to implement because
Studentobjects are stored insideGroupobjects, which are in turn stored insideModuleobjects. There were a lot of changes made to ourModelin order to implement these commands.
-
-
Minor Enhancement: Student Ratings
I created the
Ratingmodel to represent a student’s rating from scratch.-
Justification: Since our target users are Teaching Assistants (TAs), they may need to rate students as part of their teaching duties.
-
Code contributed
The sections of code that I contributed can be found [here].
Other Contributions
Project management
-
Managed release
v1.3(1 release), and coordinated all other releases on GitHub -
Managed the issue tracker and milestones
v1.1-v1.4(4 milestones) on GitHub, ensuring that high priority tasks are completed on time -
Created the Project Kanban Boards on GitHub to manage user stories, issues, and pull requests
Enhancements to Existing Features
-
Enabled arrow keys to navigate between lists in each of the Views (PR #229, PR #246)
-
Updated the existing
HelpWindowto show a summary of all the available commands (PR #240) -
Wrote additional test cases for the utility classes in the
Logiccomponent (eg. PR #352, PR #361) -
Wrote additional test cases for the
Storagecomponent, achieving close to 100% coverage for the entire Storage package (PR #359)
Community
-
Reported the bug about RepoSense not updating team member contributions, which affected a number of teams. (Forum #76)
-
Contributed to forum discussions. (Forum #112, Forum #113)
-
Enforced code quality in the pull requests of other team members
(eg. PR #189, PR #195, PR #345) -
Reviewed the pull requests of other team members in significant detail
(eg. PR #220, PR #222)
Tools
-
Integrated and managed the following GitHub plugins:
-
Travis CI - to ensure our product builds on Unix platforms
-
AppVeyor - to ensure our product builds on Windows platforms (PR #56)
-
Coveralls - to track the coverage of our team’s repository
-
Netlify - to update the team’s website whenever a documentation is changed
-
-
Provided team members with technical support for
gitandIntelliJ IDE
Contributions to the User Guide
Given below are sections I contributed to the User Guide. They showcase my ability to write documentation targeting end-users. |
Introduction
Are you a Teaching Assistant at NUS School of Computing (NUS SOC) who is tired of having to fill out the Teaching Support Student (TSS) Claims Form in great detail at the end of the semester?
Do you wish there was a desktop application that can help you keep track of your teaching duties, such as your claimable hours and student ratings, all in one place?
Look no further, because TA-Tracker is just the tool for you!
No more saving your claimable hours in an unappealing spreadsheet.
No more keeping notes about your students in a cluttered diary.
TA-Tracker is a productivity tool that is made for all you NUS SOC Teaching Assistants (TAs) who need to easily fill out forms, such as the TSS Claims Form, at the end of the semester.
TA-Tracker has features that will help you easily track and manage your claimable hours and students in one place.
What’s more, TA-Tracker has:
-
A Command Line Interface (CLI) for all you TAs who can type fast and prefer to use a keyboard, and
-
A Graphical User Interface (GUI) so that you can easily view all your teaching duties.
If you are interested, jump to [Quick Start] and discover how easy it is to fill out the TSS form using the TA-Tracker.
Command Format
(Contributed by Fatin and Gabriel)
This section shows you how all the commands in this guide have been formatted.
| Format | Meaning | Example |
|---|---|---|
Any lower case letters, followed by a forward slash |
These are prefixes. They are used to separate the different parameters of a command. |
These are prefixes: Note that prefixes cannot have spaces: |
Words in upper case |
These are parameters. You will need to supply parameters in order to complete certain commands. |
You can create a student with the name John Doe using the Suppose the Simply replace |
Words in upper case, surrounded by square brackets |
These are optional parameters. Certain commands can be used without these parameters. |
Suppose a command contains two parameters next to each other: The first parameter Since a
|
An ellipsis |
These are parameters that can be used multiple times or none at all. |
The following parameter can be used multiple times: This means that it can be:
|
Keyboard Shortcuts
You can navigate through everything in TA-Tracker with just a keyboard!
Here are some keyboard shortcuts that you can use:
| Shortcut Key | Usages |
|---|---|
Esc |
|
↑ |
|
← |
|
Syntax Highlighting
When you type a command into the command box, your input will be highlighted.
Here is a table explaining the meaning of each colour:
| Colour | Meaning | Examples |
|---|---|---|
green |
A valid user input |
|
red |
An invalid user input |
|
white |
The default font colour |

This is an example of a valid input.

This is an example on an invalid input.
Hints
When you type out a command, you will also see hints about how to use the command.
Here is a table describing the different types of hints that you will encounter:
| Hint | Trigger |
|---|---|
Showing the command usage |
|
Showing the parameter usage |
|

This is an example of what a hint may look like. You may also note that the default text colour, white is being used here.
Contributions to the Developer Guide
Given below are sections I contributed to the Developer Guide. They showcase my ability to write technical documentation and the technical depth of my contributions to the project. |
Logic Structure
The following Class Diagram shows a simplified view of the structure of the Logic component.
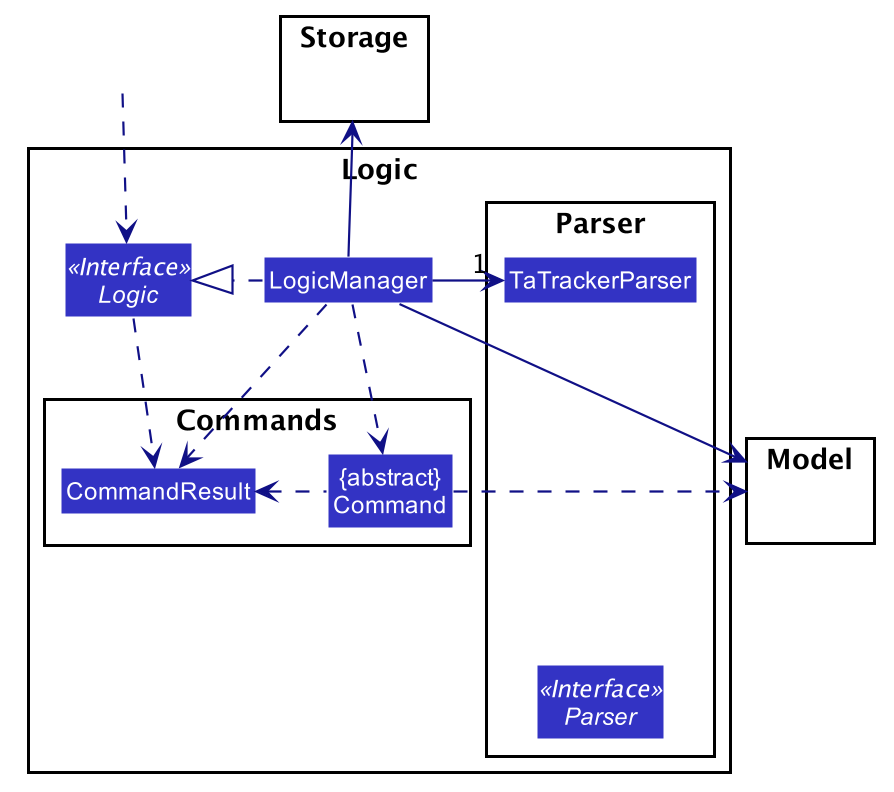
API:
Logic.java
In the Logic component,
-
Logicbehaves as a façade class between the different TA-Tracker components -
LogicManageris the main driver class behind the logic of TA-Tracker -
LogicManagerinteracts with classes in theModelandStoragecomponents -
The logic of TA-Tracker is organised into commands and parsers
-
TaTrackerParseris the main parser -
A
Commandcan interact with classes in theModelcomponent
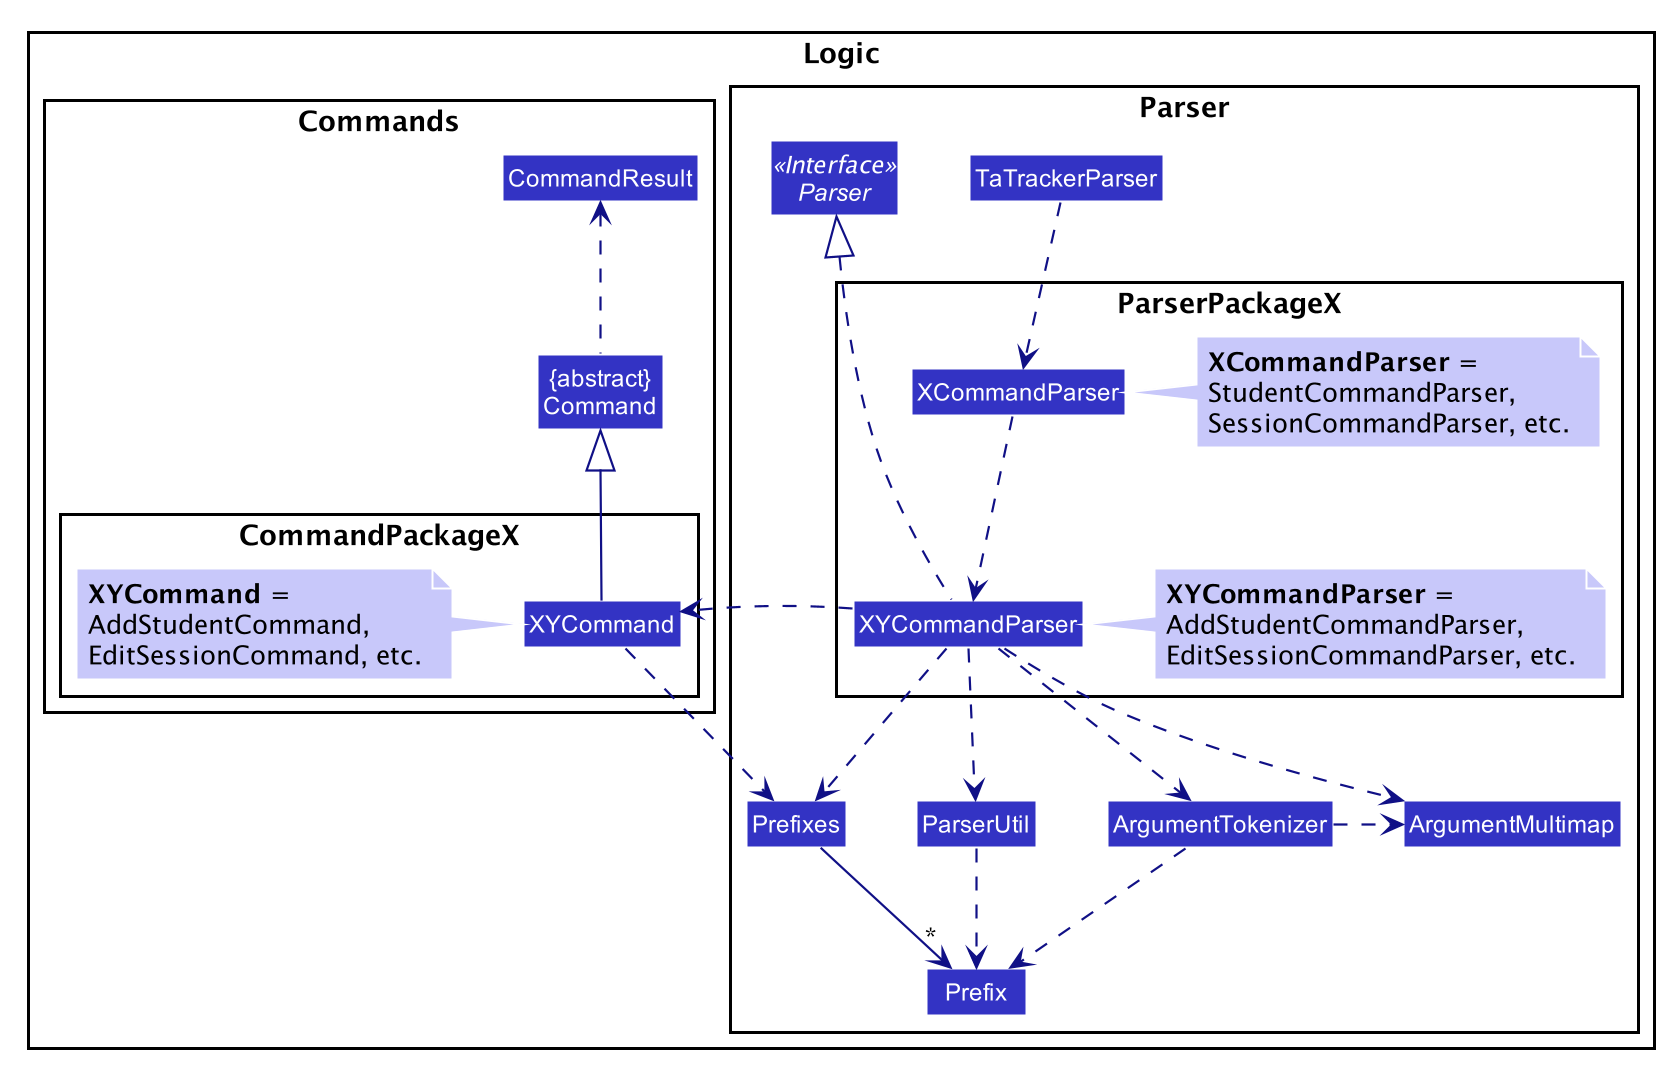
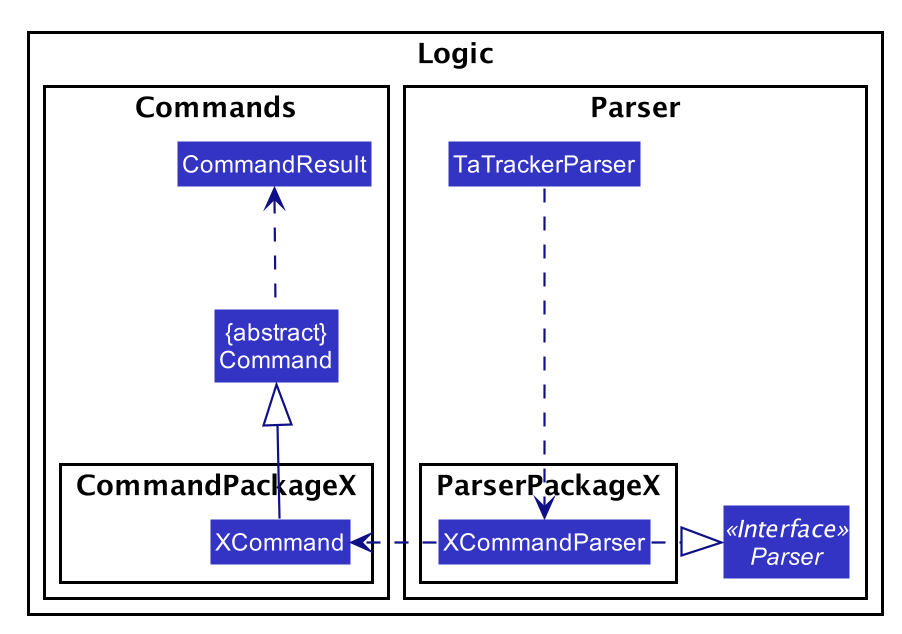
Logic Organization
The following diagram shows how the commands and parsers are organized.
|
In the Logic package,
-
There is a hierarchy of parsers, starting from
TaTrackerParser -
Within the Parser package, all parsers have been grouped into smaller packages
-
Every
Commandis created by aParserobject with a matching name -
Within the Commands package, all commands have been grouped into smaller packages
-
Every
Commandproduces aCommandResultwhen executed byLogicManager. This will modify theModelinternally (e.g. adding a student). -
The produced
CommandResultsends feedback to theUIcomponent. This feedback includes:-
Showing messages in the
UI -
Instructing the
UIto perform certain actions (e.g. displaying the help window).
-
In most cases, there are two levels of parsing before a Command is created
(e.g. SessionCommandParser passes the remaining user input to the AddSessionCommandParser
for further parsing).
However, there are some cases where only one level of parsing is needed
(e.g. for the HelpCommand, ListCommand, and ExitCommand).
These command parsers will immediately create the respective Command,
skipping the second layer of parsers.
Implementation of the Student Add, Delete and Edit Commands
(Contributed by Gabriel)
A student can be added to the TA-Tracker after a module and group is added.
The commands for students are similar to the commands for modules and groups. The main difference is that there are a few additional conditions in order to ensure that a student is inside the TA-Tracker.
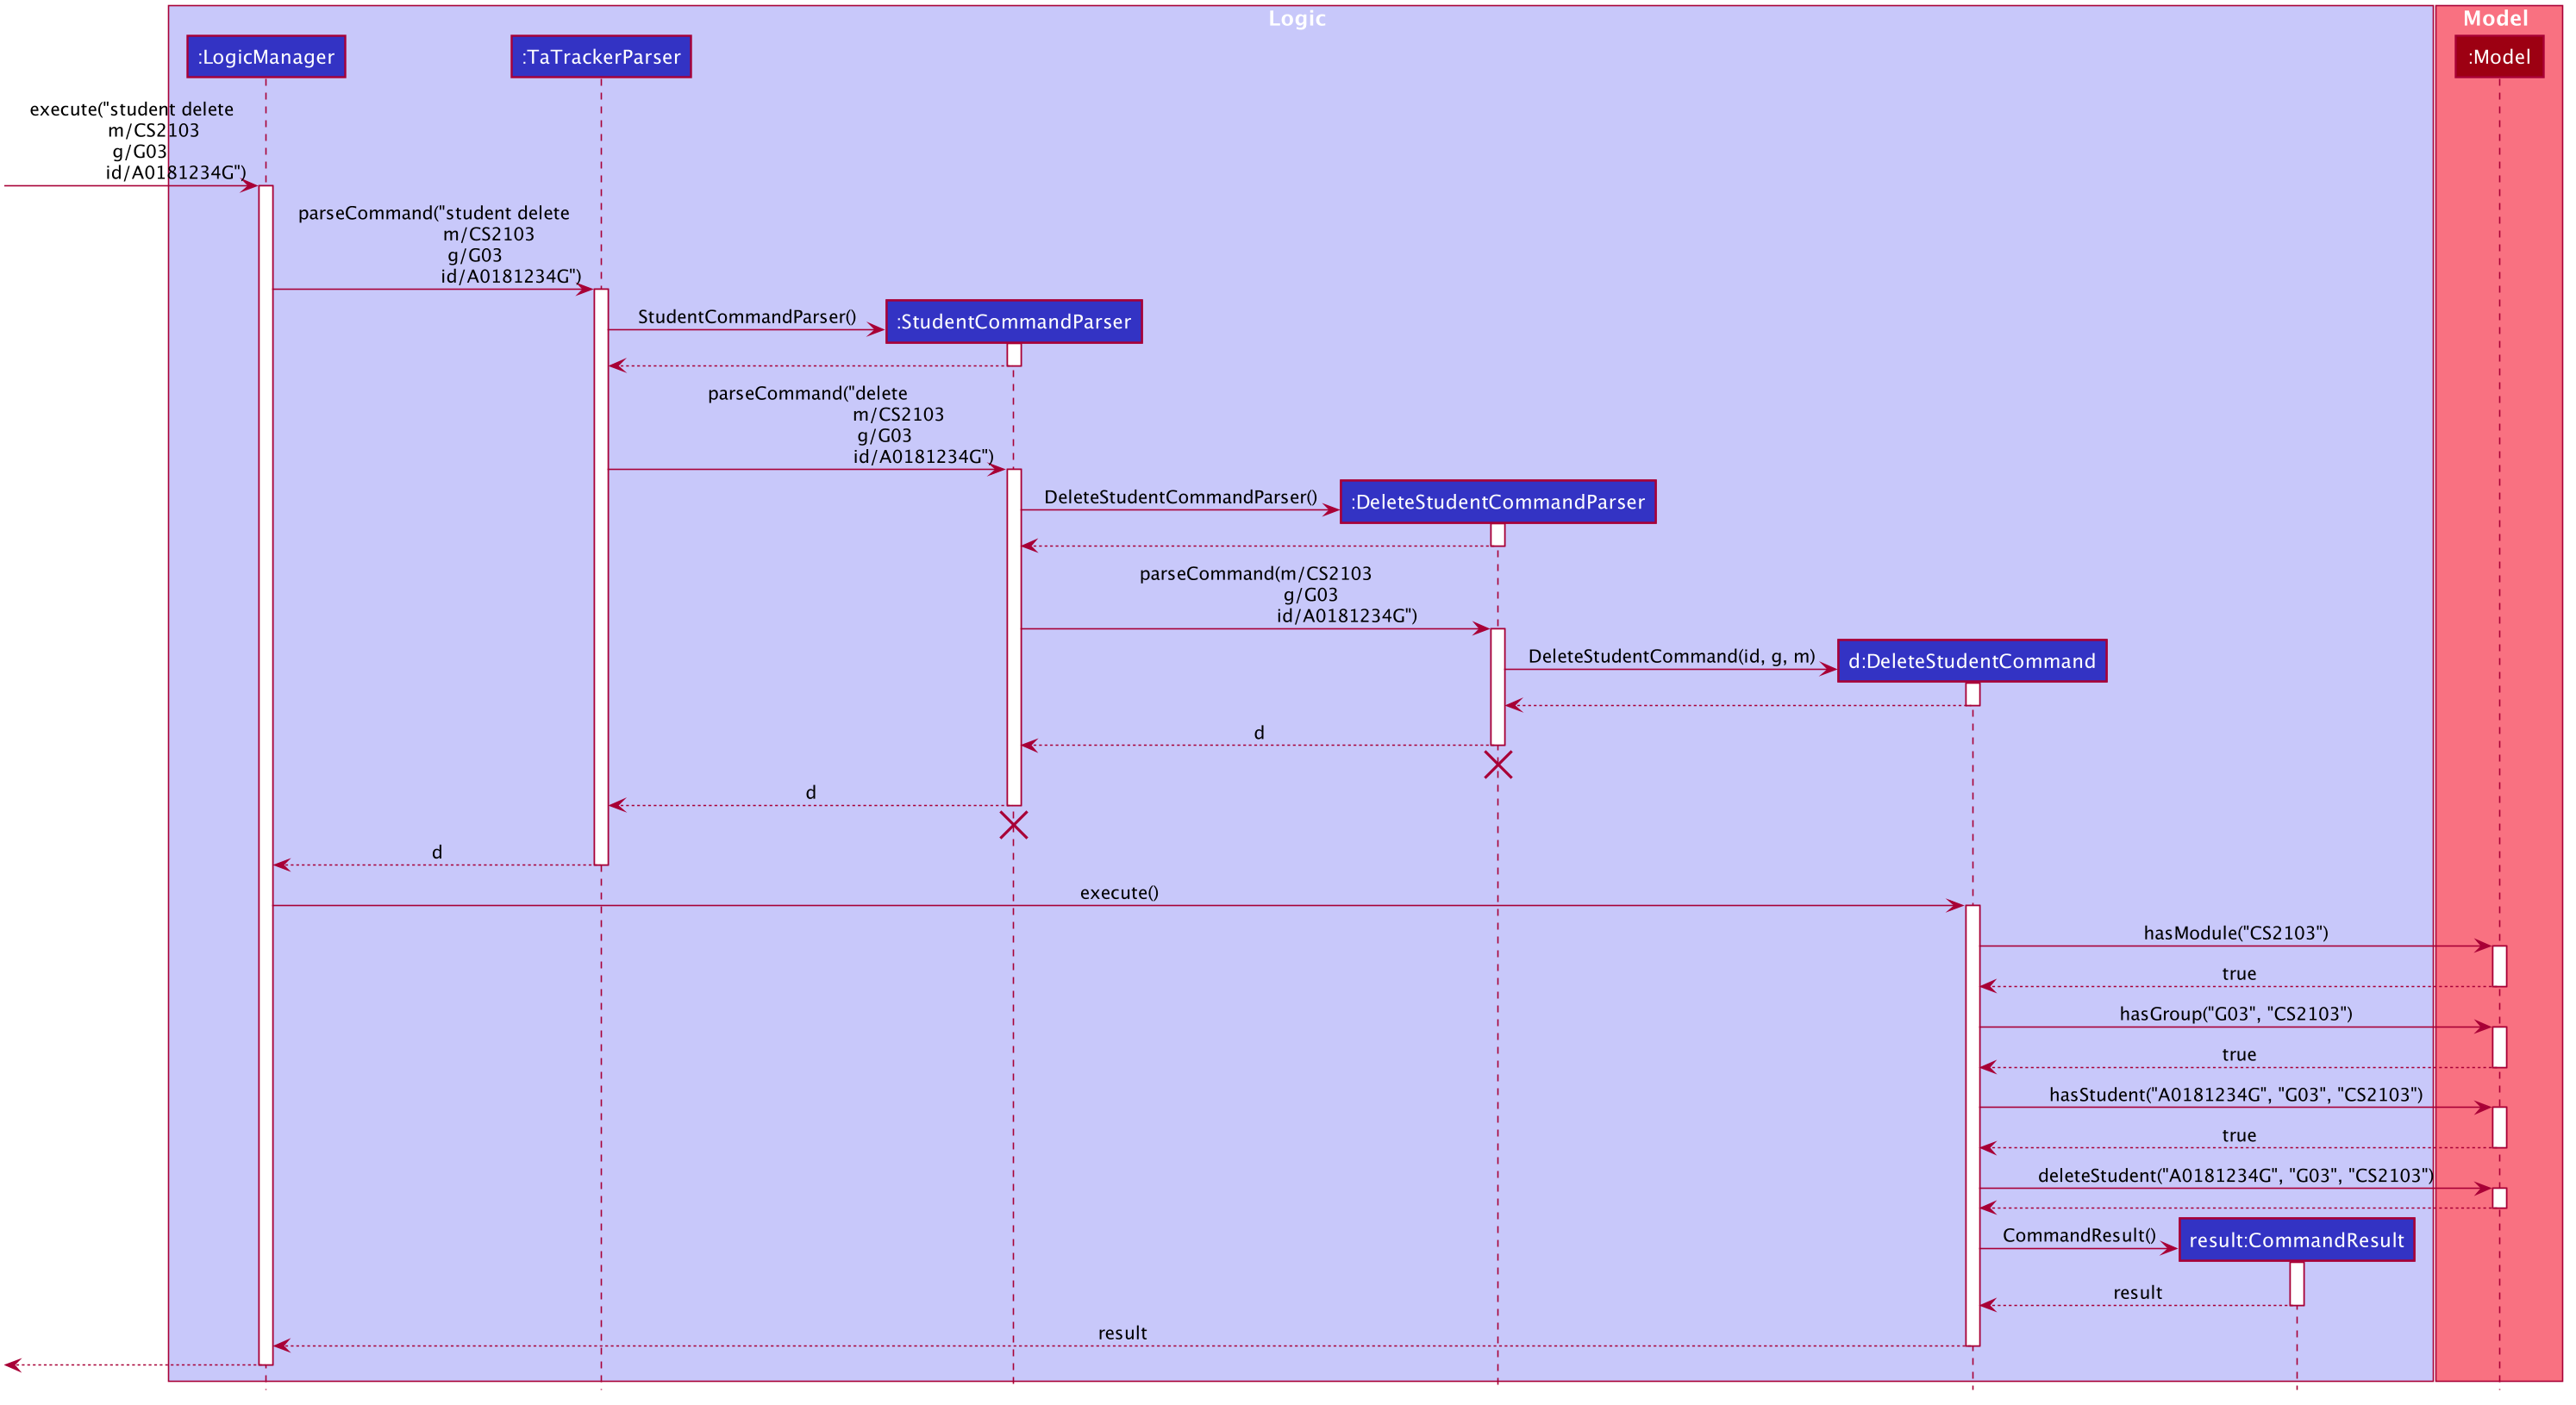
The following Sequence Diagram shows the interactions that take place
between the Logic and Model components of the TA-Tracker
when the user enters the command student delete m/CS2103 g/G03 id/A0181234G.
|
-
LogicManageruses theTaTrackerParserto first parse the user command. -
The
TaTrackerParsersees that the command is a student command and passes the command to theStudentCommandParser. -
The
StudentCommandParsersees that the command is a delete command and passes the arguments to theDeleteStudentCommandParser. -
The
DeleteStudentCommandParserthen creates aDeleteStudentCommandobject with the matric number, module code and group code from the arguments. The parser then returns theDeleteStudentCommand. -
LogicManagercallsDeleteStudentCommand#execute()to begin removing a student from the TA-Tracker. -
The
DeleteStudentCommandchecks the following three conditions:-
A module with the given module code is inside the TA-Tracker.
-
A group with the given group code is inside the same module.
-
A student with the given matric number is inside the same group.
-
-
For each condition, there are two outcomes:
-
If the condition is false, then a command exception is thrown saying that the object does not exist.
-
If it is true, then the student with the given matric number is removed from the expected group inside the expected module.
-
-
Finally, the
DeleteStudentCommandreturns aCommandResult.-
If the command successfully removed a student, the
CommandResultwill contain a success message. -
If not, the
CommandResultwill have a message explaining why the student could not be removed.
-
The student add and student edit command has been implemented in a similar manner.
However, the student add command has a slight difference.
When the student add command is executed,
there is an extra condition that must be true: there cannot be a student with the given matric number already inside
the expected group inside the expected module.
Filter Command
(Contributed by Chua Yi Jing)
Description
Different view has its own designated filter command.
-
Student View, has the
student filter -
Session View, has the
session filter -
Claims View, has the
claims filter
Implementation
This section describes the implementation of the filter command.
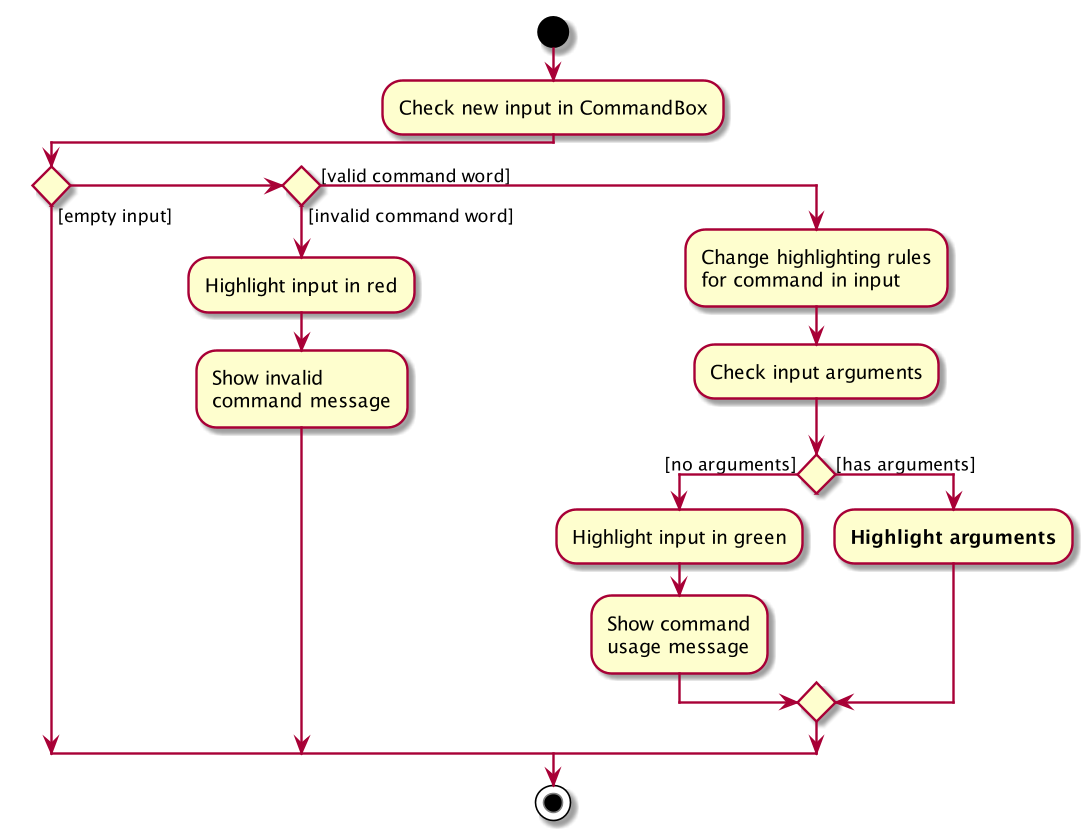
The Activity Diagram below summarises what happens when the user executes a filter command:
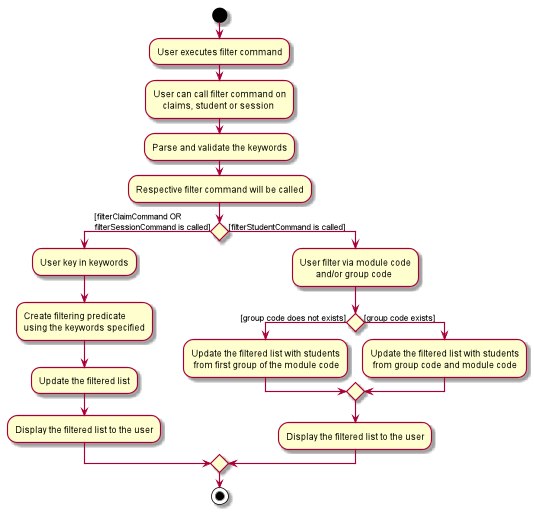
The filter feature consists of three main steps:
-
Validating and parsing user input
-
Creating a filtering predicate from user’s input
-
Updating the filtered list with the filtering predicate
Filter under Student View
Students are filtered based on the module code and/or group code given by the user.
Module code is a compulsory parameter for the user.
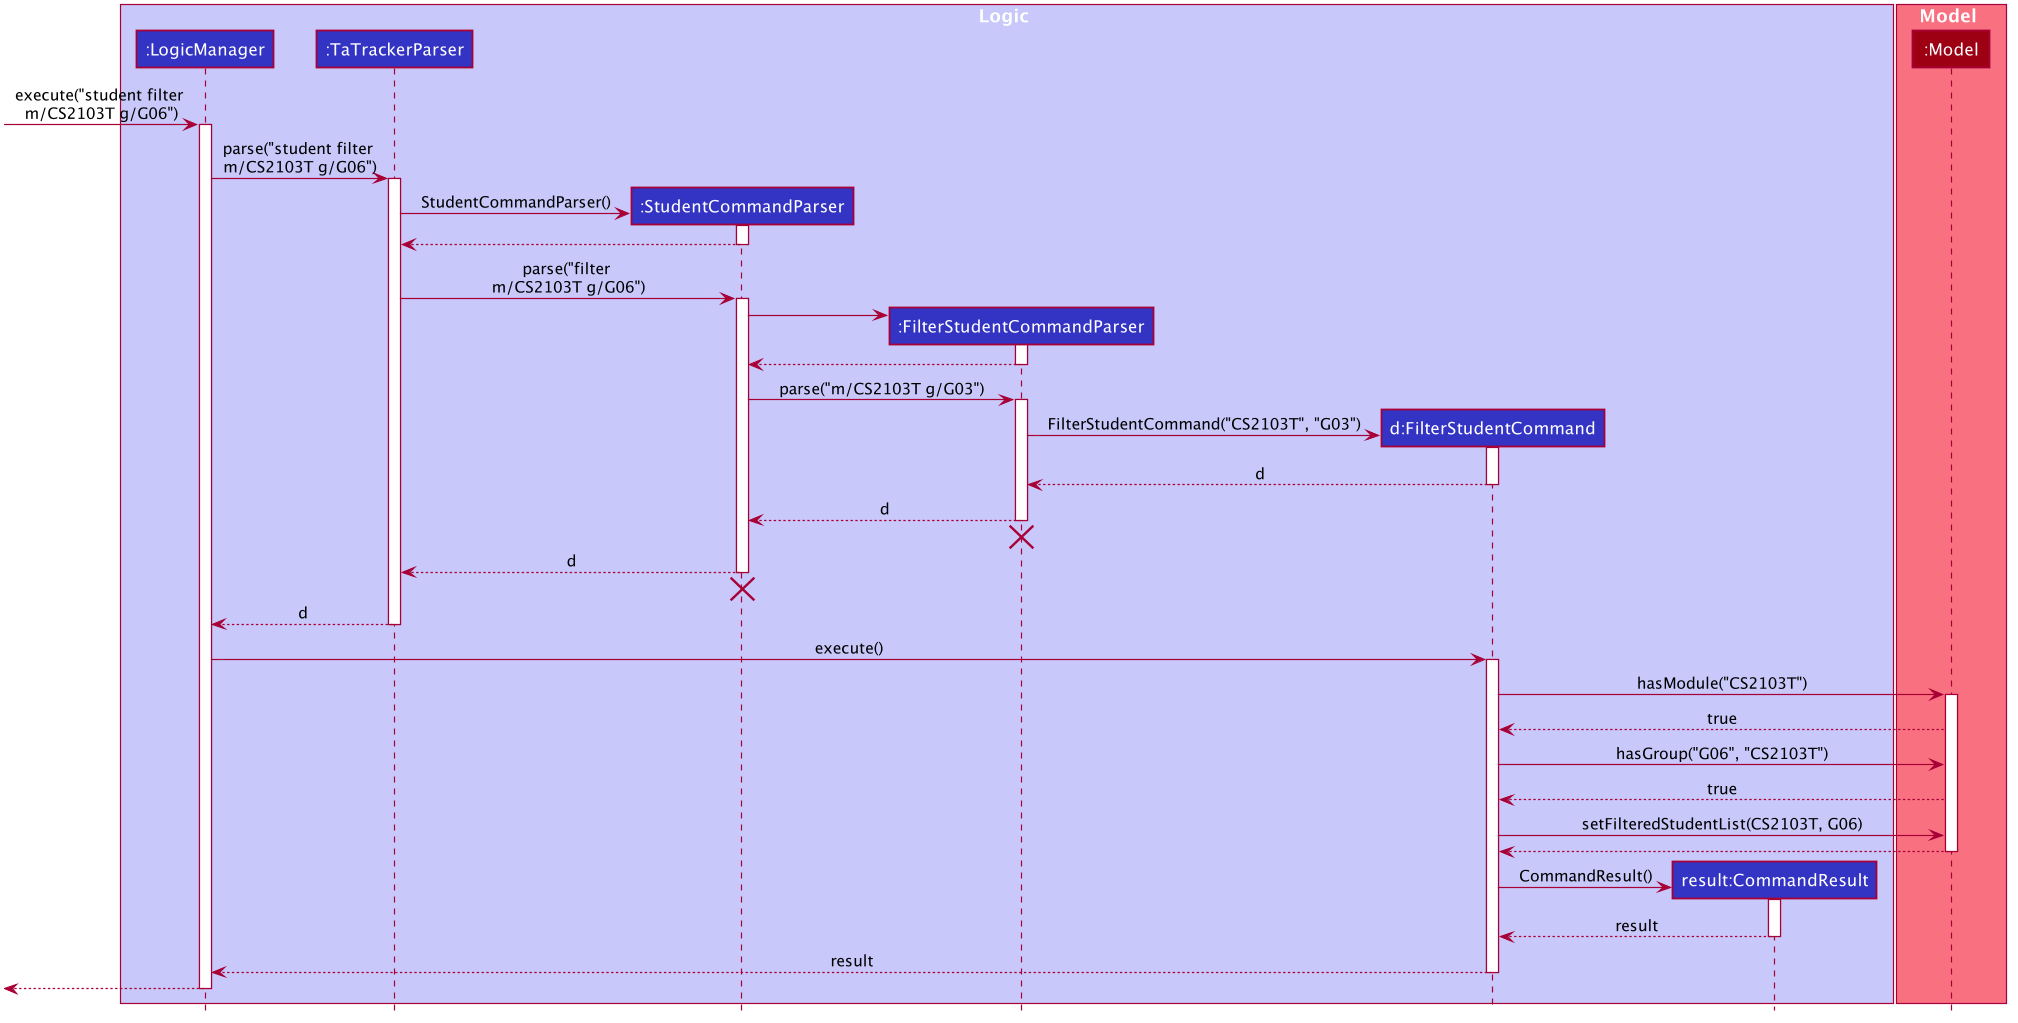
The following Sequence Diagram shows the sequence of commands that take place between
the Logic and Model components of the Ta-Tracker when the user enters the command
student filter m\CS2103T g\G06. This command will return students from module code CS2103T, under group G06.
|
Given below is an example scenario where the user enters a command to filter students.
-
The user command is passed through the
LogicManagertoTaTrackerParser.TaTrackerParserchecks the input arguments and identify the String keywords. -
The
TaTrackerParsersees that the command is a type of Student and passes the command to theStudentCommandParser. -
The
StudentCommandParsersees that the command is a type of filter and passes the arguments to theFilterStudentCommandParser. -
The
FilterStudentCommandParsercreates aFilterStudentCommandobject with the relevant keywords. -
LogicManagercallsFilterStudentCommand#execute(). -
The
FilterStudentCommandobject checks whether any of the keywords given by the user matches the existing module and/or group.-
If it doesn’t, a
CommandExceptionis thrown saying that no such students exists. -
If it does, the
FilterStudentCommandreturns aCommandResultwith a success message.
-
Filter under Session View
Sessions can be filtered with the following parameters:
-
d/DATE -
m/MODULE CODE -
t/SESSION_TYPE
These parameters can be used alone or together.
The command used to filter sessions has been implemented in a similar way. The main
difference is that the FilterSessionCommandParser creates a SessionPredicate object.
The SessionPredicate object updates the filtered session list by keywords in Model.
The filtered list will then be displayed.
When the user specifies a keyword, sessions that contain the keywords will be filtered and shown to the user.
If none of the keywords supplied by the user appears in any sessions, a CommandException
will be shown.
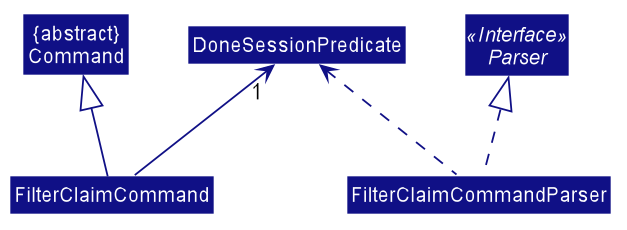
The following Class Diagram shows how different classes are related in the functioning of
the SessionFilter Command.
Filter under Claims View
The user can only filter the Claims View by module code.
When the user enters the command claims filter m/MODULE_CODE, claims that contain the module code
will be filtered.
The command used to filter claims is implemented the same way as SessionFilterCommand.
Syntax Highlighting
(Contributed by Gabriel)
When a user types a command, their inputs will be highlighted in different colours as a form of input validation.
In addition, different messages will be displayed based on the result of the syntax highlighting.
The following screenshot shows how the CommandBox and ResultDisplay appear in the TA-Tracker.
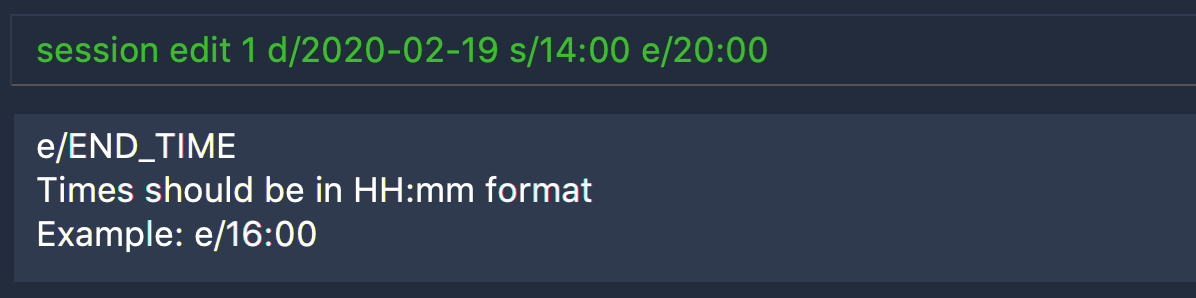
In the screenshot above:
-
There is a user input highlighted in
greenin theCommandBox -
There is a message in
whiteshowing in theResultDisplay -
The command being entered is
session edit -
The user has entered three arguments:
date,start time, andend time.
Overview
The following Class Diagram shows how the Logic and UI components interact with each other to produce the highlighting.
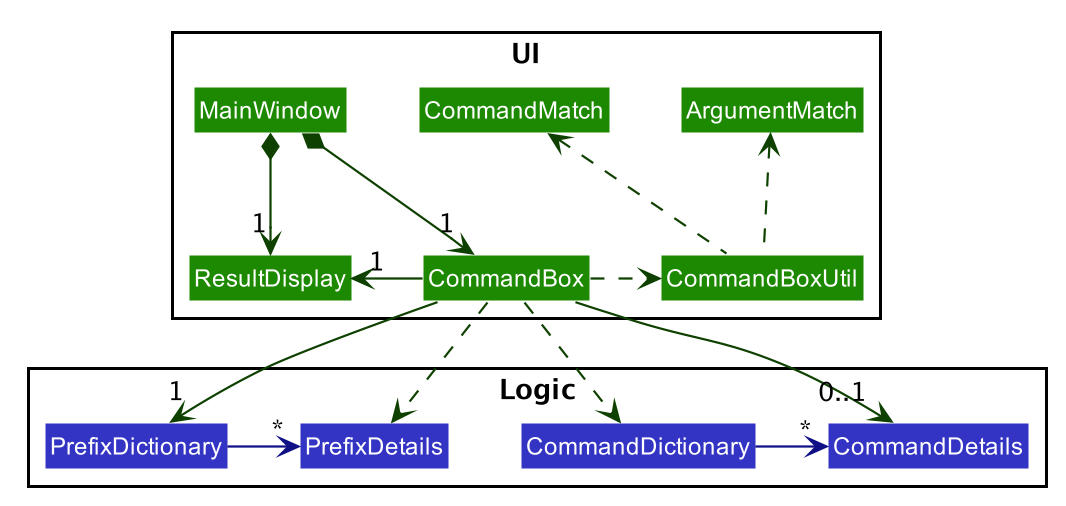
The CommandBox:
-
Uses a
CommandDictionaryto search for valid commands -
Stores a
CommandDetailfor processing the current command in the user input -
Stores a
PrefixDictionarycontaining thePrefixDetailsfor the current command. -
Uses
PrefixDetailsto process each argument in the current command -
Uses a
CommandBoxUtilto validate user inputs -
Returns feedback to the
ResultDisplay
The ResultDisplay displays the given feedback as a message in the TA-Tracker.
Identifying the parts of a User Input
Here is an example of a user input in the CommandBox:

CommandBoxUser inputs can be divided into the following parts:
| Keyword | Meaning | Example |
|---|---|---|
|
The part of the user input that identifies a command. |

Figure 11. A
full command word (coloured in blue in this screenshot){fbl} |
|
The part of the user input that identifies a command parameter. It contains a |


Figure 12. The
arguments in the user input (coloured in blue in these screenshots){fbl} |
|
The part of an |


Figure 13. The
prefixes of each argument in the user input (coloured in blue in these screenshots){fbl} |
|
Everything after the |


Figure 14. The
values of each argument in the user input (coloured in blue in these screenshots){fbl} |
|
The part of the user input (including whitespaces) between the end of the
|

Figure 15. The
preamble in the user input (coloured in blue in these screenshots){fbl} |
Implementation of the Syntax Highlighting
The following diagrams show the steps that take place when applying syntax highlighting to the user’s input.
|
Due to the limitations of PlantUML, the following Activity Diagrams may not follow UML notation. In particular, there are issues with representing alternate branches. For example, alternate branches:
There is a way for the diagrams to be arranged vertically. However, this dilates the diagrams, making them difficult to fit in this guide. |
Step 1 - Highlighting a new input
Syntax highlighting is applied when the user changes their input in the CommandBox.
The following Activity Diagram shows how the full command word is highlighted,
up until the beginning of the preamble.
| There should be a rake symbol next to the bolded activity - Highlight arguments. |
Here is the purpose of each alternate path in the above diagram:
| Path | Action | Example |
|---|---|---|
|
When there is no input, no action occurs. |
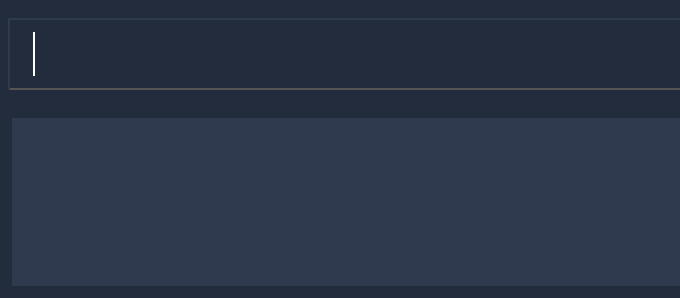
Figure 17. An empty
CommandBox{fbl} |
|
When there is no matching |
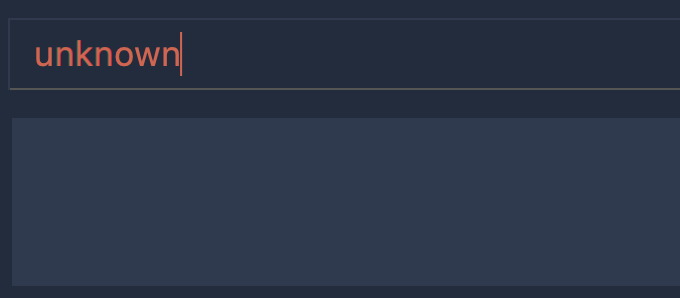
Figure 18. Invalid
full command word{fbl} |
|
When a |
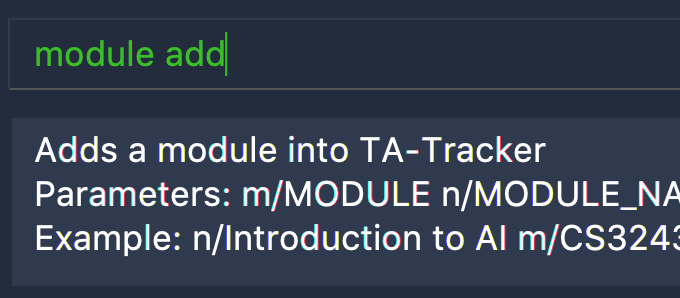
Figure 19.
CommandBox has no arguments{fbl} |
|
After processing the |
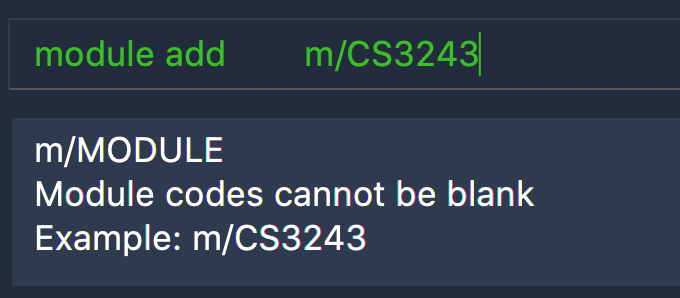
Figure 20.
CommandBox has arguments{fbl} |
Step 2 - Highlighting the preamble
If the new input has a full command word,
the next step is to apply syntax highlighting on the preamble and arguments.
The following Activity Diagram shows how the preamble is highlighted,
up until the beginning of the first argument.
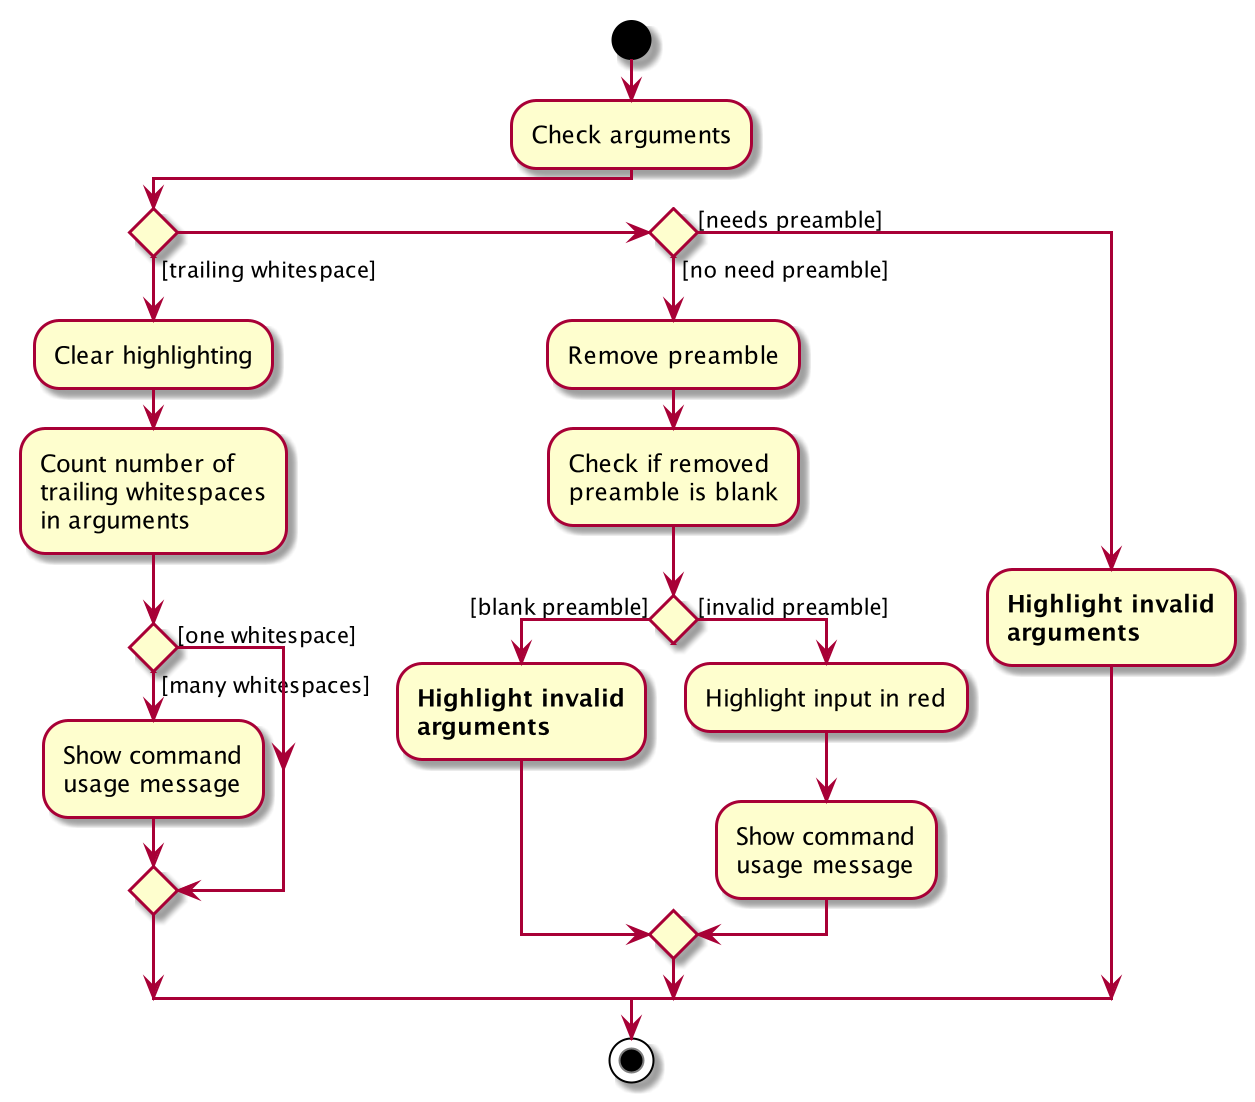
| There should be a rake symbol next to the bolded activities - Highlight invalid arguments. |
Here is the purpose of each alternate path in the above diagram:
| Path | Action | Example
* whitespaces |
|---|---|---|
|
When there are trailing whitespaces, the syntax highlighting is removed. |
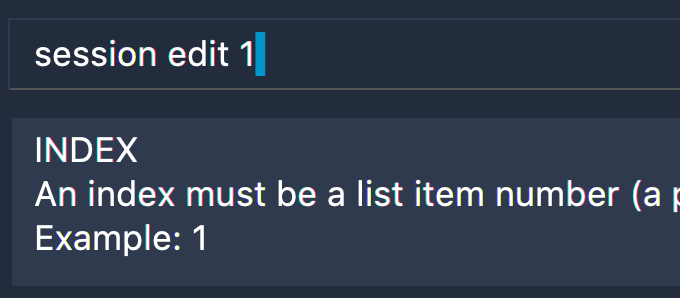
Figure 22. A trailing whitespace (coloured in blue in this screenshot)
{fbl} |
|
When there are two or more trailing whitespaces,
the |
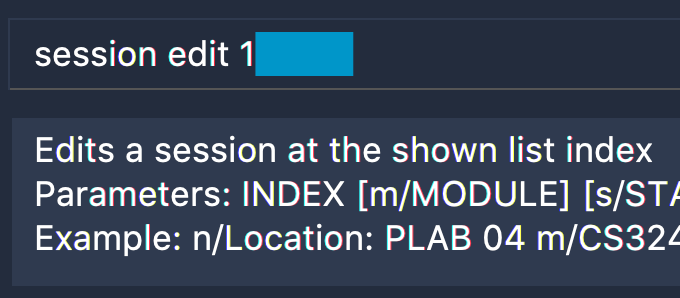
Figure 23. Many trailing whitespaces (coloured in blue in this screenshot)
{fbl} |
|
When the input has a |
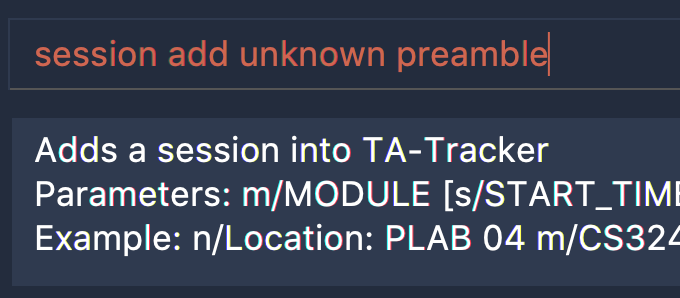
Figure 24. An invalid
preamble{fbl} |
|
After processing the |
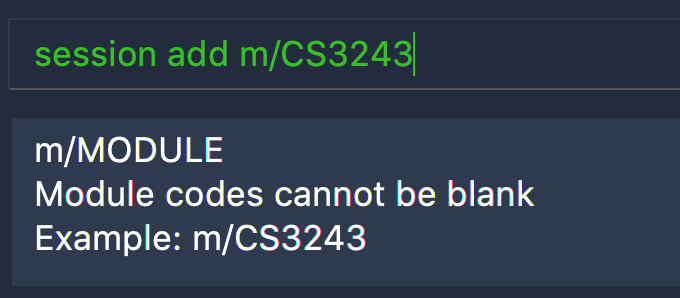
Figure 25. A command that requires a blank
preamble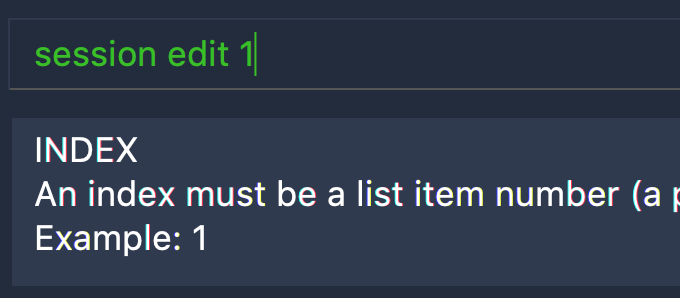
Figure 26. A command that needs a valid
preamble{fbl} |
Step 3 - Highlighting the remaining arguments
After the preamble has been verified,
the syntax highlighting is applied on each argument in the remaining user input.
An invalid or wrong argument will stop the highlighting.
The following Activity Diagram explains how each argument is highlighted,
up until end of the user input.
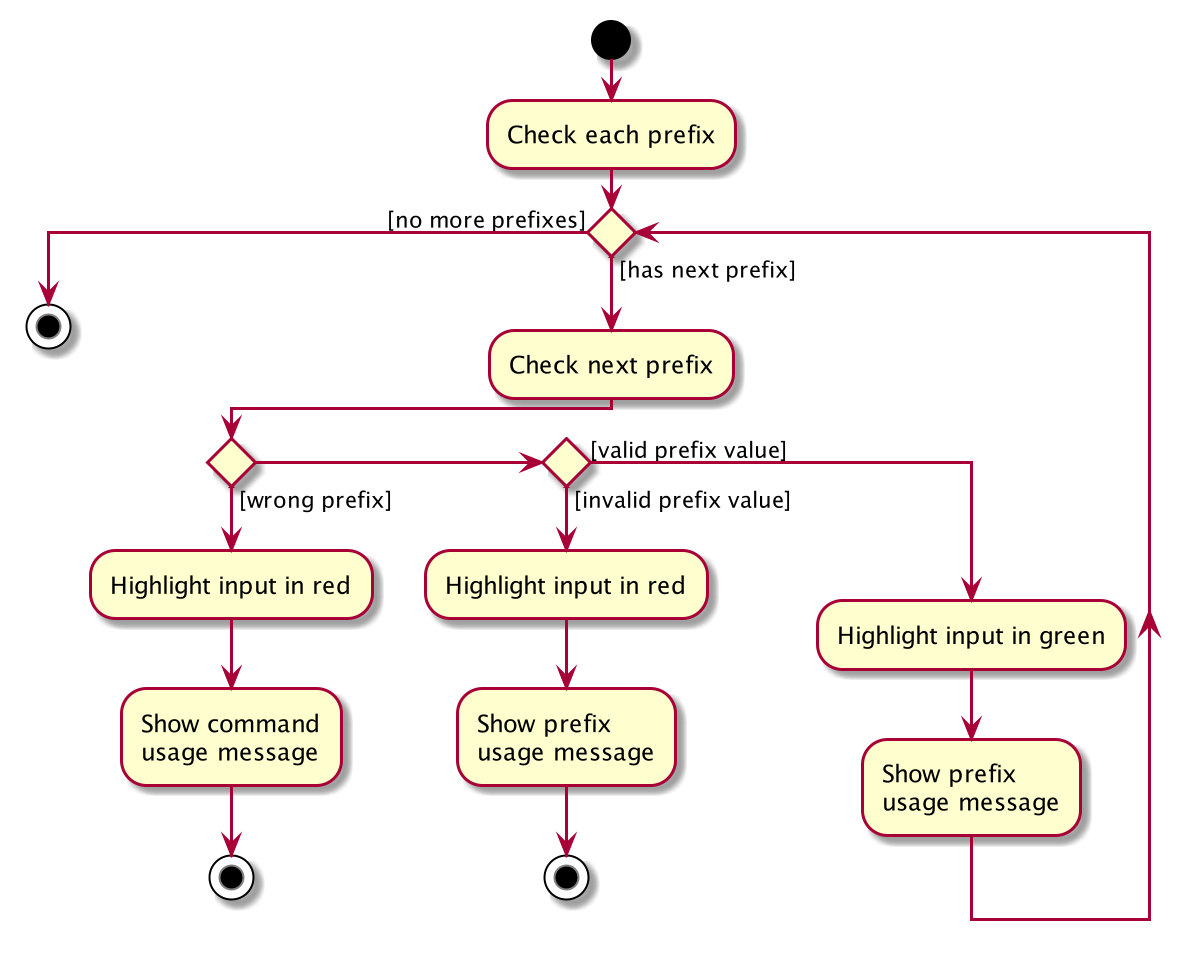
Here is the purpose of each alternate path in the above diagram:
| Path | Action | Example |
|---|---|---|
|
When the command does not recognise the given |
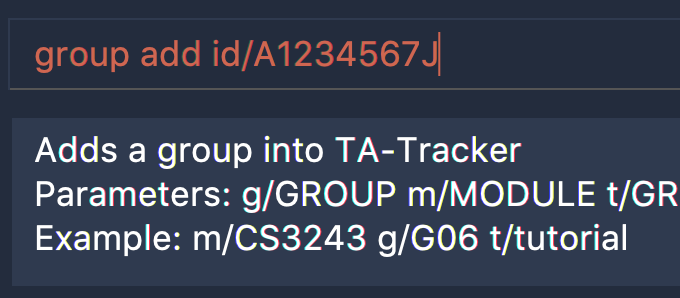
Figure 28. Wrong
argument in input{fbl} |
|
When the |
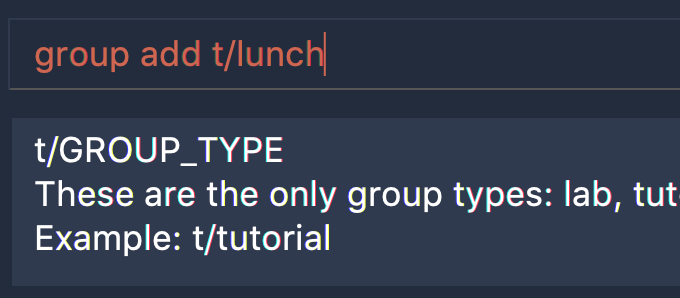
Figure 29. Invalid
argument in input{fbl} |
|
After processing the current |
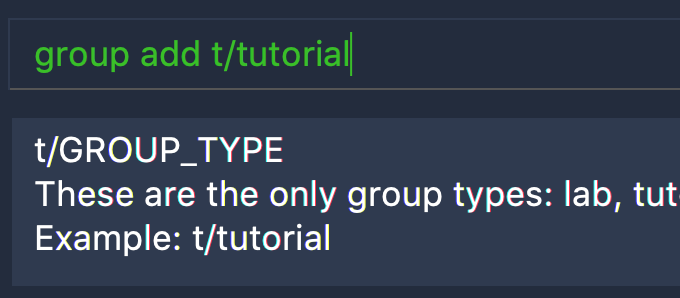
Figure 30. Valid
argument in input{fbl} |
Design Considerations
Showing the command usage after every two white spaces
When a user enters two white spaces, the usage for the current command wil reappear in
the ResultDisplay. The purpose of this is to provide the user with a quick example
of how to use the command, since a command may have a lot of parameters.
The following are reasons why the usage appears after every two spaces:
-
The user will have to enter whitespaces frequently. This should allow our target users (whom are fast typers) to quickly verify how to use the different commands.
-
A user input will usually have words separated with a single white space
-
It gives a use for user inputs to have
argumentsseparated with more than one whitespace
Alternative Implementation
An alternative would be to assign a keyboard shortcut, such as the Tab key, to give the user the option to display the command usage only when they need it.
Currently, the ResultDisplay shows the command usage
whenever the user inputs something new. This could be annoying for the user
when they are familiar with the commands.
However, the user may have assigned actions to these keyboard shortcuts on their computer, Therefore, TA-Tracker would need to allow the user to assign their own keyboard settings.
As TA-Tracker is meant to be used primarily on the CLI, assigning keyboard shortcuts does not seem like a suitable feature for our target users. However, implementing this is an option in future versions of TA-Tracker.
Always showing the syntax highlighting
Similar to the previous design consideration, the syntax highlighting could instead be toggled on and off using a keyboard shortcut.
Alternative Implementation
Alternatively, there could be a command to toggle the syntax highlighting on and off.
Here is an example of how the command could be made:
-
syntax on- enables the syntax highlighting -
syntax off- disables the syntax highlighting -
syntax cmd- enables the syntax highlighting forfull command wordsonly -
syntax args- enables the syntax highlighting forargumentsonly
Then, the CommandBox will have boolean flags to toggle the syntax highlighting
before the each of the three steps explained in the Implementation of the Syntax Highlighting.